Each flight log entry usually
represents a launch or test day, and describes the
events that took place.
Click on an image to view a larger image, and
click the
browser's BACK button to return back to the
page.
Day 24 -
Underwater Launches and New Launcher
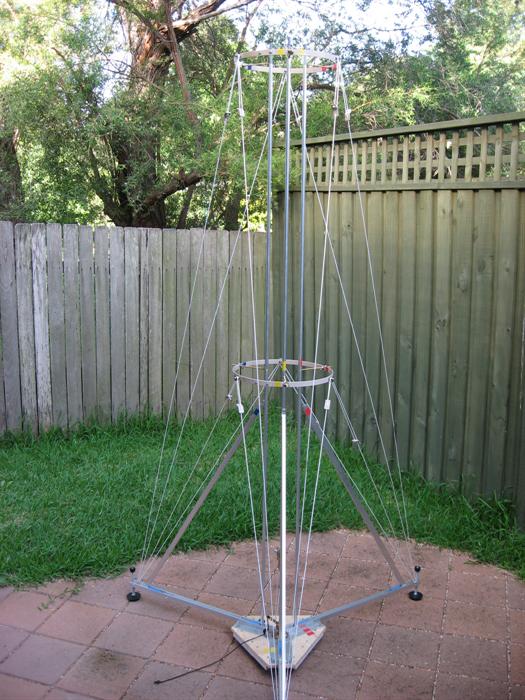
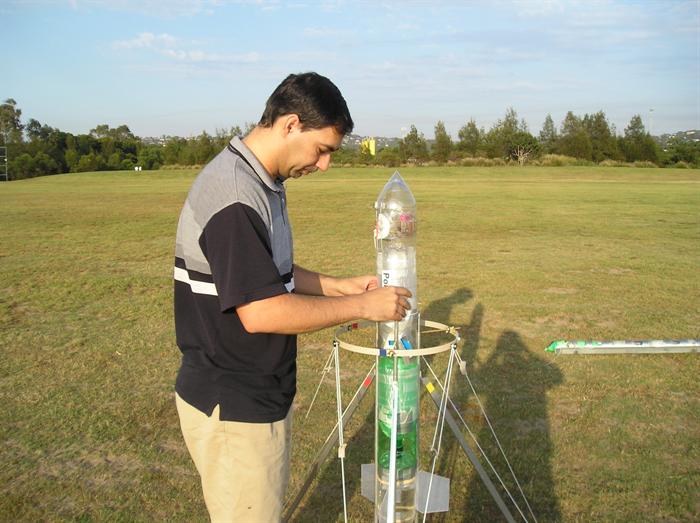
Fully assembled new launcher. Here it is
shown with the 2 meter guide rails.
Launcher with the top 1 meter of guide rails
removed.
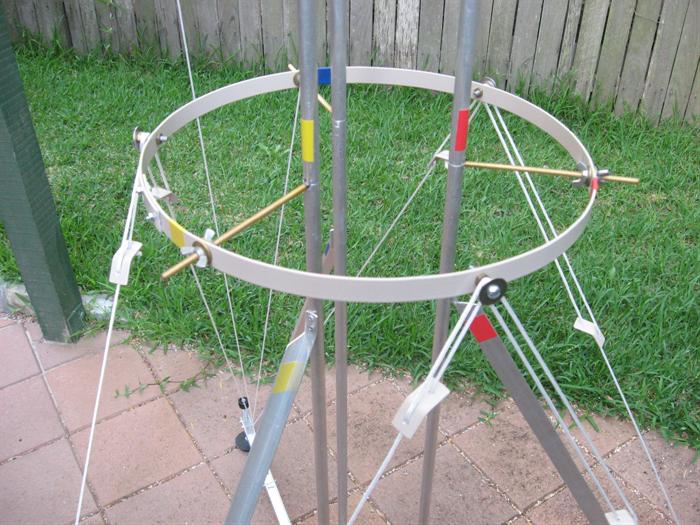
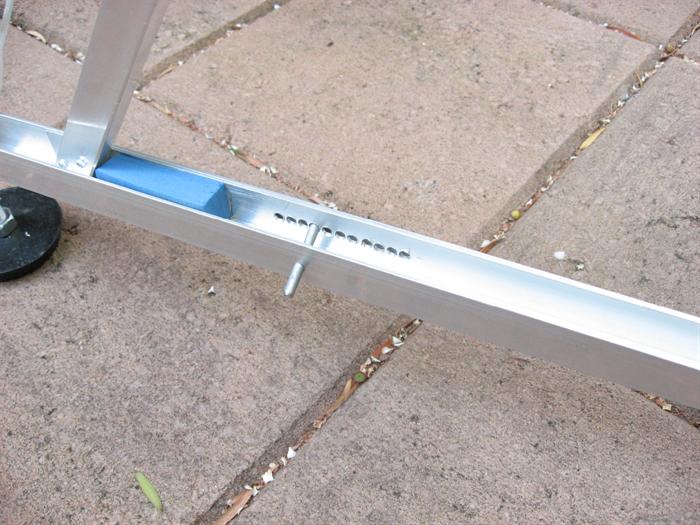
A detail of the adjustable ring.
Detail shot of the foot. There is a thread
in the leg that allows the foot to be adjusted
up and down.
Detail of the release mechanism lever and
pulley.
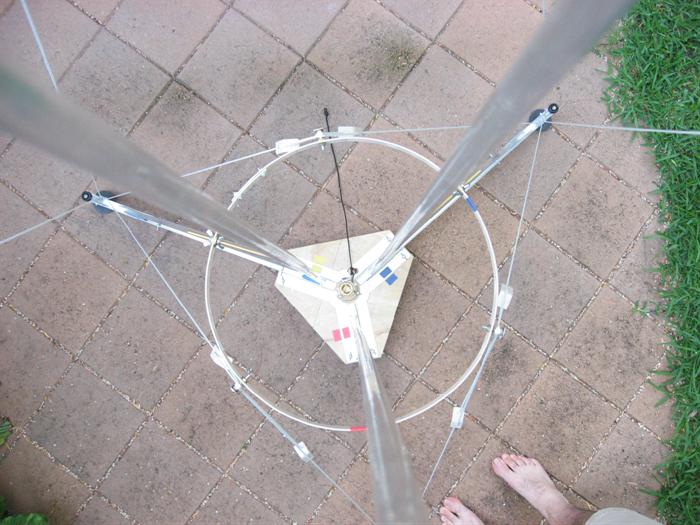
Looking straight down the launcher.
Detail of the brace position adjustment.
There are two of these per brace.
The launcher packs up for easy storage. Most
nuts are wing nuts to allow for assembly without
tools.
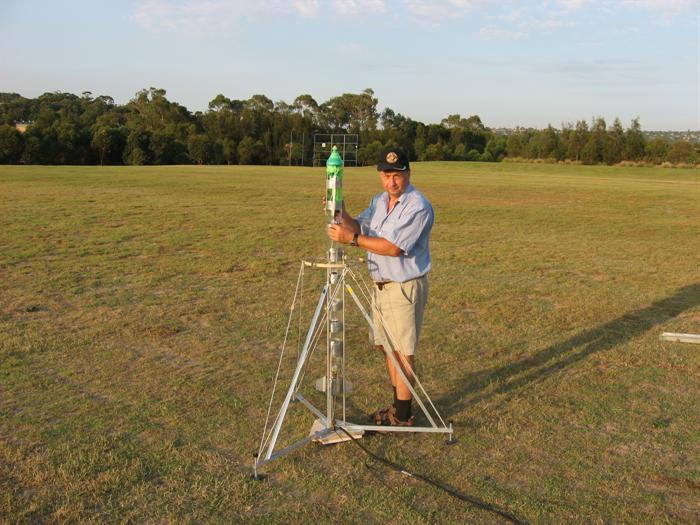
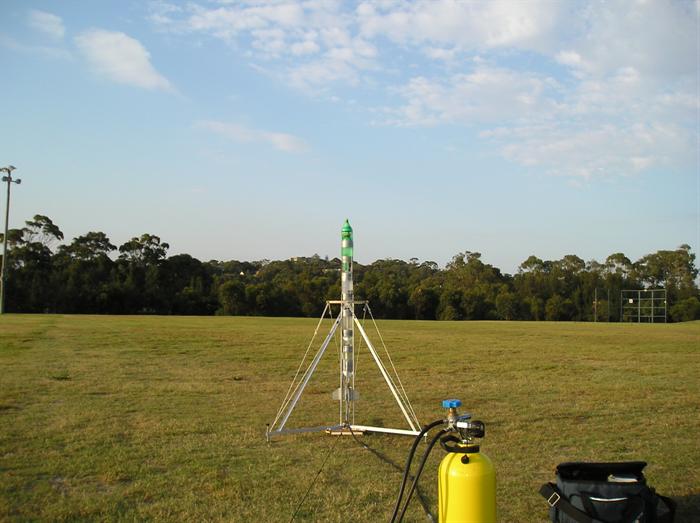
J4 II loaded into the new launcher.
J4 II pressurised and ready for takeoff.
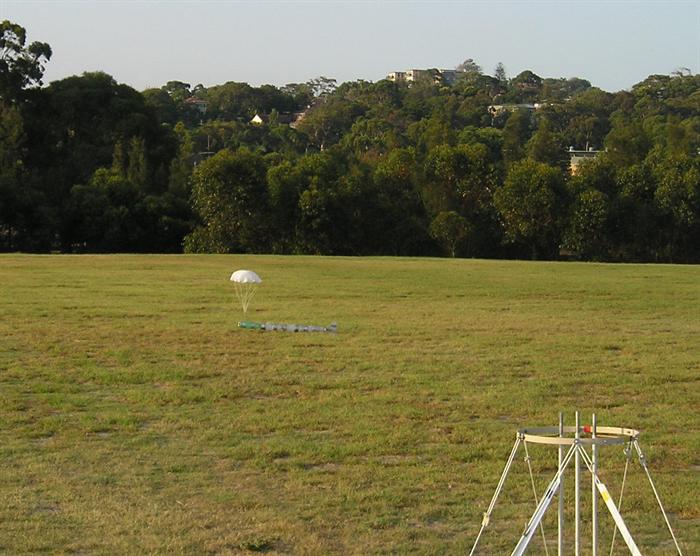
An interesting shot, the rocket is already
lying on the ground but the chute is still open.
Loading Polaron II into the new launcher.
Polaron II crashed after I forgot to turn on
the flight computer during a hasty launch.
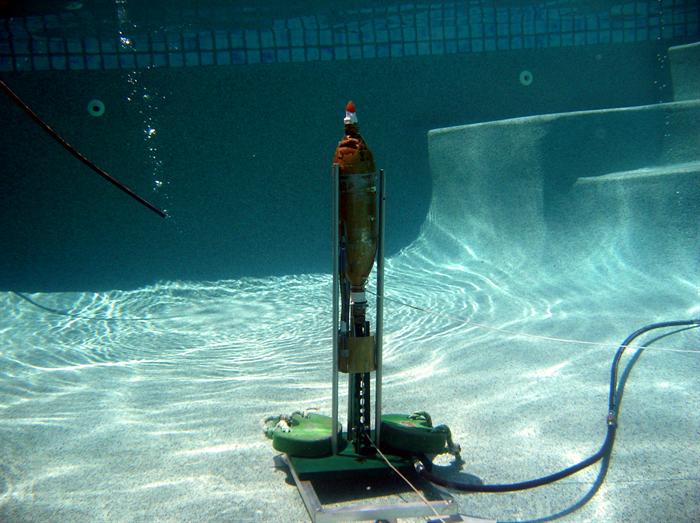
Setting up the old launcher and Cena rocket
for its maiden underwater launch.
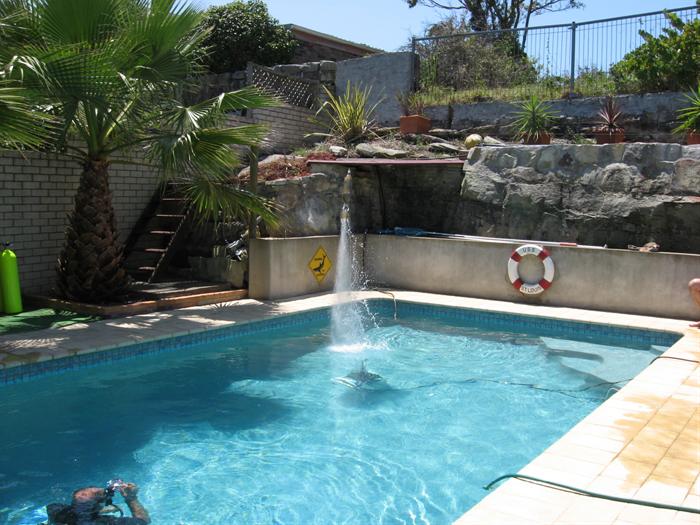
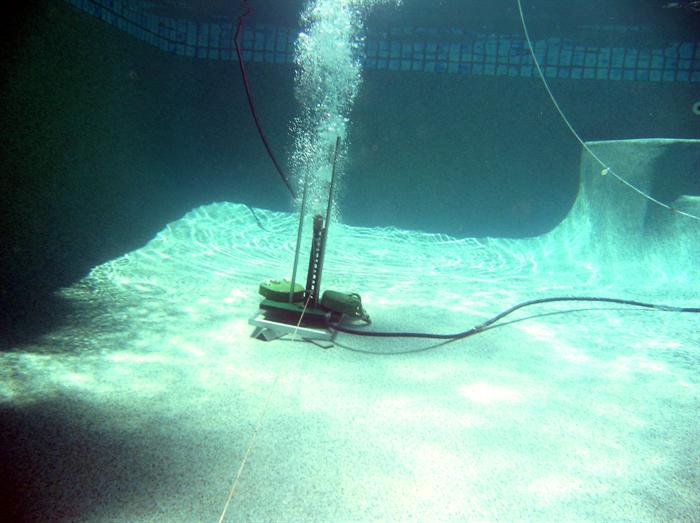
Cena breaks through the surface from a depth
of 1 meter.
Another flight at higher pressure.
Just out of camera shot, the rocket is held
down by a line to prevent it flying into the
neighbours yard.
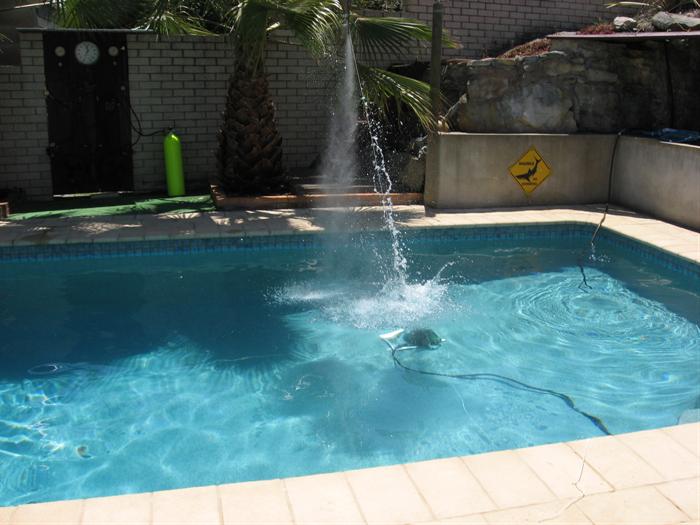
Cena pressurised to 90 psi.
Launch.
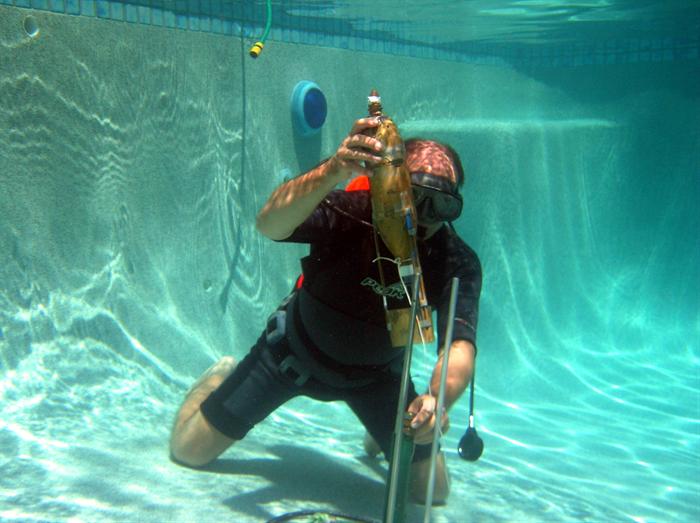
Reloading Cena for another 90 psi launch.
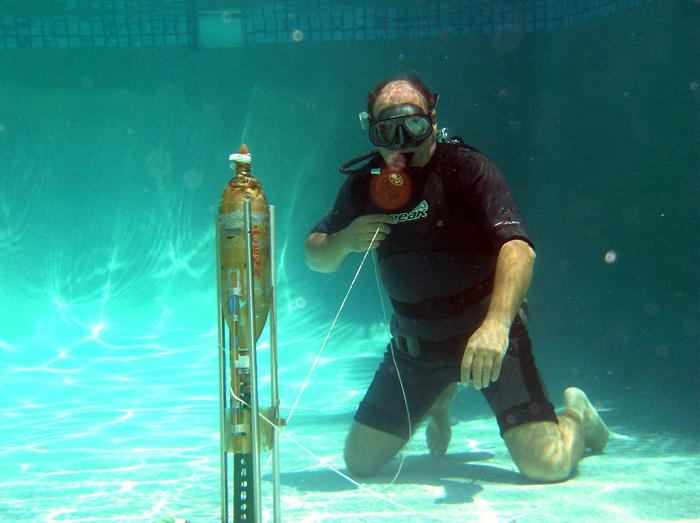
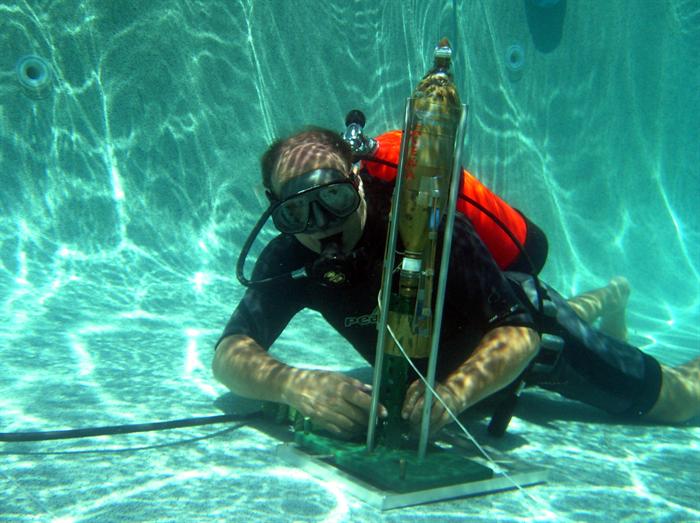
Its not every day that you get to pose next
to an underwater water rocket.
"Look what happens when I pull this string"
Both the rocket and operator are pressurised
by air from a SCUBA cylinder.
A new rocket rebuilt from the
last launch attempt that failed on
the launch pad.
Team Members at
Launch Event:
PK, GK, HK, AK, IK, JK, John K and Paul K.
Number
of launches: 4 (part 1), 4 (part 2)
On this day we conducted a couple of new
tests and experiments. The first was the
test of our new launcher. In testing the new
launcher we launched a couple of new rockets
as well. The new launcher is discussed in detail in
the Design and Development
section below.
The second experiment was launching a
water rocket from underwater (see part 2).
Why would we want to do that? Why not? We
hadn't seen it done before, and we had no
idea what would happen.
Flight Day Events - Part 1
We assembled the new launcher and
adjusted it for the first rocket. The
setup was quite straight forward, and
doesn't take long, although it is a little
more complex than our old launcher. Since
there was virtually no wind we only used
the 1 meter guide rails.
J4 took off very well out of the new
launcher and proceeded almost vertically,
the nosecone deployed well, but the
parachute didn't unfurl properly almost
all the way down. The parachute opened
about 3 meters above ground which caused
the rocket to swing around horizontally
and land undamaged on its side. A pretty
close shave!
We launched it a second time and this
time the nosecone came off just after the
air pulse so basically the parachute
opened at very high speed, the nosecone
line ripped from the rocket and the
nosecone kept going up, but the parachute
brought the rocket down safely. I am glad
we have learned to put strong parachute
lines on the rockets, they can prevent
hours of work in repairs.
Second up was a rebuilt Polaron
rocket. It was in a different
configuration since the last attempt. The
rocket had only 3 bottles and a new set of
fins. The fins were constructed of a
fairly thick pieces of plastic, and only
held in place with rubber bands. We are
now looking at using this technique to
hold fins onto the rockets because tape
tends to come off easily especially when
the bottles stretch. Some tapes also leave
a pretty nasty sticky residue when they
are removed for repairs. Because of the
length of the rocket, we decided to
dispense with the fin strut extensions so
the fins are now directly mounted on the
last bottle.
The flight computer was set and the rocket
pressurised to about 80 psi, and one of
the joints started slightly leaking. We
hadn't pressure tested the rocket prior to
launch day, so it was hardly surprising.
It turns out that it just wasn't tightened
enough.
Since the leak was only slight we decided
to launch anyway. The rocket flew a
beautiful flight, and on the in-flight
video you could see that it only spun on
its axis a few degrees. The parachute
opened as expected and as the rocket was
coming in to land close to the launch pad,
I raced after it and caught it before it
hit the ground.
(If the video does not play, try
downloading the latest
Flash player from Macromedia)
Since the launcher was configured for
Polaron, we reloaded it into the launcher
and started filling it. We were going to
go for 110psi, but at around 90psi the
joint started leaking again, but a little
more this time, so in a quick hurry I told
dad to launch it and gave a quick
countdown. The rocket took of great but as
it was on its way up ... I called out
something like "s**t I forgot to turn the
computer on!!!" Well you can imagine what
happened next. The parachute will not
deploy if you do not turn the computer on
and arm it. So instead we watched it crash
pretty hard. The payload section was
completely smashed in, one of the flight
computer's PCB's snapped in half and most
of the release mechanism components were
bent. The launch detect micro switch lost
its armature. Later when I checked the
little motor and gearbox, I noticed that
it was sticking. I thought that one of the
gears must have also split, but on
disassembly it turned out that there was a
tiny grain of sand from the crash stuck in
one of the teeth. Cleaning it out resolved
the gearbox problem.
An interesting artefact of the crash was
the fact that the fins, being attached by
rubber bands, allowed them to come off in
a triangular pattern a couple of meters
from the impact site. They weren't damaged
and were easily reattached.
The one big thing we learned from this
crash, was that procedures and checklists
are needed for these more complex
rockets and launch sequences. There will
not be any more rushed take offs. If in
doubt, DO NOT LAUNCH.
Flight Day Events - Part 2
Later on in the day we decided to cool
off in the pool, but this time we took the
old launcher and an older rocket with us.
We had been talking about this for a
couple of weeks, so it was high time we
did it. The rocket that we used has served
us very well from the first few days of
experiments, and has continued to do so.
There was virtually no adaptation of
the rocket and launcher for these
experiments. We only tied a string to the
rocket so it would not fly over the fence,
and we had to weigh the launcher down with
lead weights so that the rocket would not
lift it off the bottom.
The first launch was only at 40 psi.
We played it conservatively at first so
that we could see what would happen. The
rocket only flew a couple of meters above
the surface, but had no problems from
getting above the surface, having
penetrated about 1 meter of water.
We increased the pressure to 70 psi
and launched again, this time the rocket
went higher and would have gone more had
it not been for the string. The submerged
string caused a lot of drag on the rocket.
Later we launched the rocket a couple
of times again from the same depth with
90psi. The rocket had no problems in
leaving the water and would have gone to a
considerable height had it not been for
the string.
(If the video does not play, try
downloading the latest
Flash player from Macromedia)
It was a fun experiment, and what did
we learn from it?
- It is difficult for the diver releasing the rocket to communicate the
count down with the surface personnel.
Holding a camera in one hand, the release
string in another and a regulator in their
mouth was the problem.
- The water provided less drag than was
expected.
- It is feasible to launch water rockets
from under water.
If you have questions or comments feel
free to visit our
blog and leave a comment.
Flight Record
Launch
Rocket
Pressure (PSI)
Notes
1
J4 II
100
Very straight
flight up, the nosecone came off a
little early, but the parachute
again tangled and it opened about 3
meters above ground and brought the
rocket to a safe landing.
2
J4 II
130
Good take off
but failed to get any reasonable
height due to very early parachute
deployment. The nosecone ripped off
and kept flying. Rocket landed well.
3
Polaron
80
Very good
flight although relatively low in
altitude due to the low pressure.
Rocket started leaking, but launched
with computer set to “4” setting.
Good in-flight video obtained.
Rocket was caught as it was landing.
4
Polaron
90
Started leaking
and launched hastily, forgot to turn
on the computer. Flight was good and
straight, although rocket was
heavily damaged on impact.
5
Cena
40
Good launch,
from a depth of 1 meter, only went
about 2 meters above surface.
6
Cena
70
Better launch, went
higher. Tether limit was reached.
7
Cena
90
Good flight. Tether
limit was reached.
8
Cena
90
Good flight. Tether
limit was reached.
Design and Development
Last time we attempted to fly a couple of
long rockets we discovered that our launcher
was inadequate to support them when there
was even a minor cross breeze. The
relatively short guide rails also tended to
provide less guidance for rockets - which as
a result were more likely to stray from
vertical.
So we decided to build a new
adjustable launcher that will support the
next phase of development. We are calling
this the medium launcher, as the rockets we
are planning in the more distant future will
need an even bigger one.
Medium Launcher
The launcher has 4 feet, having one fixed
in the middle to support the weight of the
rocket and the other three adjustable to
allow the launcher to be levelled on uneven
ground, or be angled in a specific
direction.
The launcher has three 2 meter guide
rails that support the rocket’s cylindrical
body. The guide rails do not require the
rocket to have any special guiding
attachments. The guide rails are in separate
1 m lengths to allow for easier storage and
allow rockets to be placed more easily on
the launcher.
The guide rails are supported by a cross
member at the end of each foot for
stability. Each guide rail can be moved and
locked into position in 5mm increments
relative to the center of the launcher,
allowing rockets of various diameters to be
launched. The guide rails are connected by
supporting rings that ensure the correct
rocket clearance is maintained along the
full length of the launcher. One ring is at
the 1 meter mark and the other is at the two
meter mark.
Each ring has a separate
adjustment for each guide rail, so fine
tuning of direction and clearance can be
achieved. Each ring is also supported by 6
tensioning lines to prevent the guide rails
from twisting. The rings are also designed
to provide clearance for rockets with both
conventional and ring fins.
The release
mechanism is based on an all brass Gardena
hose attachment. The release mechanism
stands off the launcher about 30 cm allowing
rockets with ring fins to be launched. The
base of the release mechanism has a quick
connect hose fitting for air and a small
lever and pulley for the release string. The
Gardena hose attachment was modified to
include a custom return valve to prevent
water entering the hose.
Line tensioning is achieved using the
same technology that tents use to tighten
lines – a piece of bent metal with two holes
in it. Very simple and very effective.
The
launcher can be used with just the 1 meter
launch rails for smaller rockets, or in the
2 meter configuration for longer rockets.