Overview
If you are considering using a scuba tank to pressurise your water
rockets then this article covers a number of issues you should consider
first before making the investment. Although scuba tanks are likely to
have the highest start-up costs when compared to hand pumps or small
compressors, once set up, the cost per launch is very small and usually in
the order of
a few cents.
Scuba tanks are also known as scuba cylinders or
diving cylinders.
|
 |
|
Advantages
- No effort is needed when filling rockets like you have with
hand or foot pumps.
- No power supplies or generators required as you may need
for
compressors.
- You can fill rockets quickly which allows you to launch more rockets
during a launch event.
- You can pressurise large rockets easily.
- You can fill rockets to high pressures easily.
|
Disadvantages
- Expensive set up if you need to buy all the components.
- There is a need for refilling the tank with potential restrictions
on who and where they can be filled.
- They are heavy to carry around.
- Special handling precautions are needed for compressed
gasses.
|
CAUTION
Before we jump in, it's important to first consider the safety
aspects of compressed gasses. Pressurised tanks can be hazardous if not handled with respect. You
should always follow the correct safety practices when handling scuba
tanks, as you would with any other pressurised tank.
- Do not overfill the tank past it's ratings.
- Keep moisture out of the tank. Internal corrosion could become an issue.
- Don't leave your scuba tank in a hot car. Pressure will build up
inside the tank when it gets hot.
- Have your tank regularly inspected and hydrostatically tested.
There are standards on how often this should be done.
- Do not drop the tank onto the valve. In fact, don't drop it at
all! You don't want to know what happens when a tank valve is
broken.
- Transport your tank horizontally and secured it to prevent
it
from rolling around.
- Store your tank vertically.
Other Important Safety Considerations
- If you adjust the intermediate pressure on the 1st stage
regulator, Label the stage "Not for breathing" to make sure
someone doesn't come along later and try to dive with
it only to discover they aren't getting enough air 100 feet below the
surface..
- Use only high pressure (HP) hoses for connecting components to the HP port of
the 1st stage regulator. These need to be able to handle at least
3000psi.
- Avoid making your own adaptors for any HP connectors, Only use
commercial components rated for the pressure.
- Fill your rockets slowly. Filling them quickly can cause
excessive internal heating weakening the plastic and causing them to
fail prematurely.
What you need to set up a Scuba tank air supply for your water rockets
Before looking at how we can connect everything together let's have a
look at some of the components that you may need for the air supply.
You may want to jump ahead and see some of the
configuration options so
that things are clearer where the different components fit in the
whole scheme of things. Click on the links below to find out more about each
component,
Scuba Tanks
Tank Sizes
Scuba tanks come in quite a few different sizes and are usually made
from steel
or aluminium. Larger tanks store more air
but make transportation a little more difficult if you have
to carry them to the launch site. The following table shows a list of
some common tank sizes and their operational pressures:
|
 |
| Cylinder |
Air |
Weight |
| Material |
Volume |
Pressure |
Volume |
Full |
| |
(litre) |
(bar) |
(litre) |
(kg) |
| Steel |
12 |
200 |
2400 |
19.0 |
| 15 |
200 |
3000 |
23.8 |
| 16 (XS 130) |
230 |
3680 |
23.9 |
| 8 |
300 |
2400 |
16.0 |
| 10 |
300 |
3000 |
20.8 |
| Aluminium |
9 (AL 63) |
203 |
1826 |
13.5 |
| 11 (AL 80) |
203 |
2247 |
17.2 |
| 13 (AL100) |
203 |
2584 |
20.3 |
|
Here is some more info on tank sizes:
http://www.huronscuba.com/equipment/scubaCylinderSpecification.html
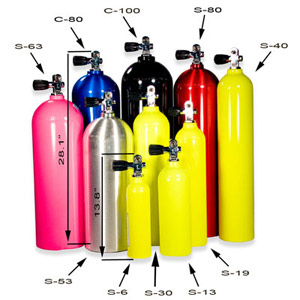
Tank valves
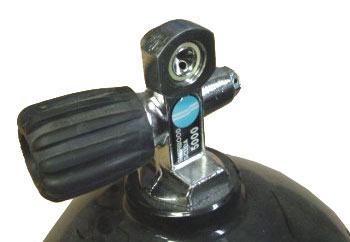
There are two main types of tank valve used on scuba tanks. The DIN
valve has an internal thread for connecting the regulator, while the
K-valve uses a yoke. There are also two kinds of DIN fittings: 200 DIN
fitting which is rated for 200 bar and 300 DIN which is rated for 300
bar. You can connect any equipment with 300 DIN fittings to the
200
DIN valve, but not the other way round.
It's
not important what kind of valve the tank has for our purposes,
but it will affect what type of regulator you should buy for your tank.
There are adaptors available to connect one to the other but these just
add extra cost. DIN fittings are popular in Europe while the Yoke type
are more common in the US. There really isn't a price difference between
the two.
K-valve or Yoke |
DIN Valve |
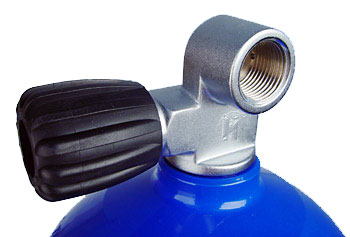
Here are two examples of 1st stage regulators, one with a Yoke
fitting and one with a DIN fitting.
Yoke fitting (left) and DIN fitting (right)
Regulators
Standard scuba equipment uses two pressure regulators. The
1st stage regulator goes on the tank and converts the tank
pressure down to an intermediate pressure (IP) of around 140-150 psi (10
bar). The
2nd stage (demand valve) connects to the 1st stage via a hose and goes in your
mouth. The 2nd stage converts the intermediate pressure to a pressure
you can breathe which varies with depth. You generally do not need the
2nd stage regulator for water rockets.
Terminology Note: For clarity in this article we will often refer to the
Intermediate Pressure (IP) as Low Pressure (LP).
|
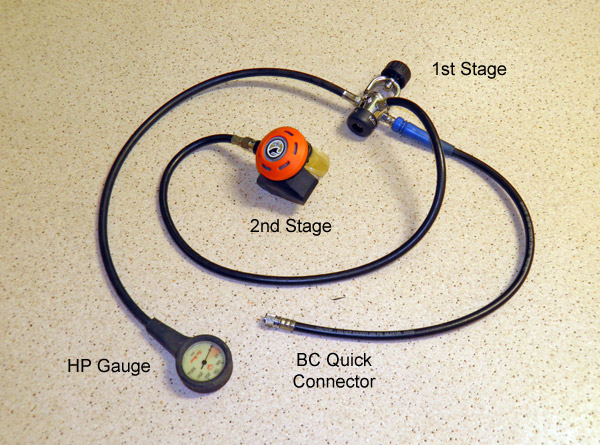
Typical scuba regulator setup with 1st and
2nd stages, a high pressure gauge and a BC connector. |
There are two main types of 1st stage regulators - one uses a piston
and the other uses a diaphragm. Piston first stages tend
to be cheaper and easier to service while the Diaphragm first
stages are sealed, and can have their output pressure
adjusted. If you have a choice of which regulator to get, I
would recommend the diaphragm type for it's pressure adjustment
capability.
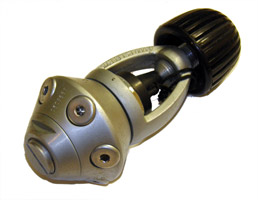
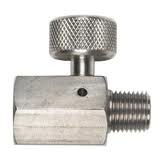
A typical 1st stage regulator will have 1-2 two HP ports and 2-5
LP ports available for you to connect various equipment to, The HP ports are
typically marked on the regulator body. Any unused ports need to be
plugged with LP or HP plugs.
|
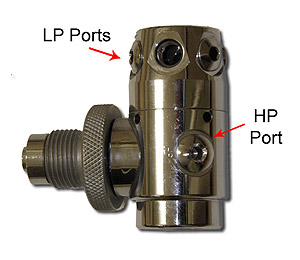
An example of a 1st Stage
regulator
showing HP and LP ports |
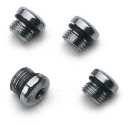
Plugs seal unused
ports |
Adjusting pressure
You can adjust the pressure of a diaphragm regulator usually with an
Allen key. NOTE: for most purposes you probably will not need to do
this, but it is a way to increase the intermediate output pressure of
the 1st stage regulator. If you decide to change the set pressure, label
the regulator "not for breathing" as mentioned in the safety
considerations. The range over which you can adjust the pressure depends
on the regulator model, but in general you should be able to adjust it
from 0 to about 200psi (14 bar). The default setting is usually around
140 - 150psi (10 bar)
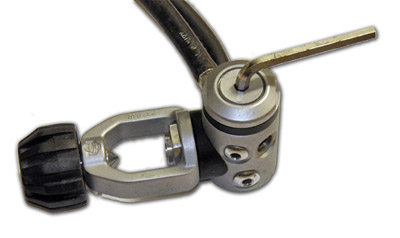
An Allen key can be used to adjust
pressure on a diaphragm regulator |
This regulator has a slot instead of a hex head for
adjusting pressure |
Pressure gauges
You would normally use two pressure gauges on your scuba tank water rocket
air supply. The high pressure gauge tells you how much air is left in the tank, and
the low pressure gauge tells you how much
pressure is in your rocket/launcher.
A typical HP gauge will show
pressures in the range of 0 - 4000psi ( 0 - 300bar ) while a low pressure one
will show 0 - 300psi (0 - 20 bar)
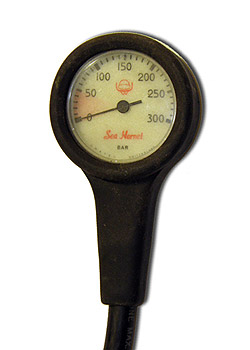 High Pressure gauge |
 Low Pressure gauge |
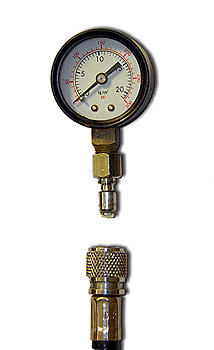
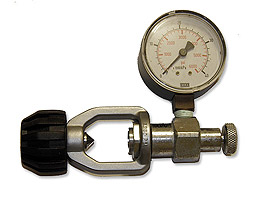
You can also buy pressure checking gauges that fit on the
scuba tank instead of the 1st stage regulator. They come with their
own yoke or DIN fitting and have a pressure release valve. Here are
a few examples:
Pressure checking gauge
with a yoke fitting |
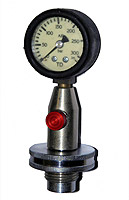
Pressure checking gauge
with a DIN fitting |
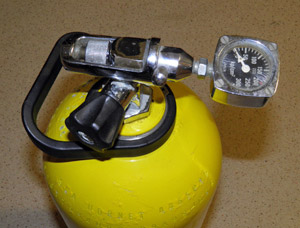
Pressure Checking gauge
attached to a tank |
These are useful when your 1st stage regulator
doesn't have a high pressure gauge.
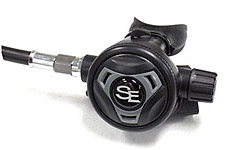
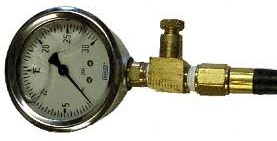
Pressure release valves
A pressure release valve (also know as a bleed valve) is used to depressurise a pressurised
portion of your air supply. These can take any number of forms. Here are
a few examples:
|
2nd Stage Regulator
When connected to the 1st stage, pressing
the purge button will release the pressure.
|
 |
|
Bleed valve on LP gauge
Sometimes the low pressure gauge will have
an integrated pressure release valve.
|
 |
|
Separate valve
You can pretty much use any valve rated to
the pressure as a release valve. Just use the correct
adaptors to connect it to a hose or air manifold. |
 |
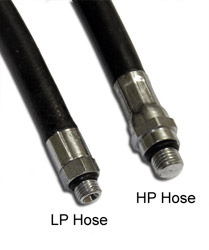
Hoses
There are two different types of hoses commonly used with scuba
equipment. A high pressure (HP) hose connects your HP gauge to the HP
port of your 1st stage regulator. Low pressure (LP)
hoses connect to the 2nd stage regulator and a buoyancy compensator
(BC) for example. For water rockets you need to be able to connect your launcher to
one of the LP hoses. There are several different ways of achieving this.
You can use a standard air hose that you may already have on your
launcher, and then use an adaptor that will allow it to connect directly
to the LP port on the 1st stage.
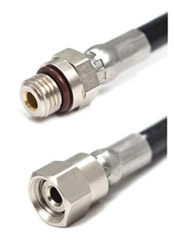
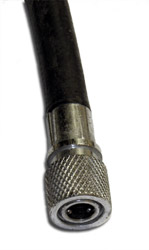
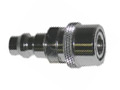
Alternatively you can use a standard scuba hose with a
quick connector (normally used for connecting to a BC) and then attach a
quick connector adaptor to the end of your hose. The one advantage to using the quick connector is that it
has a valve in it, and when disconnected it closes so that you can
measure the tank pressure.
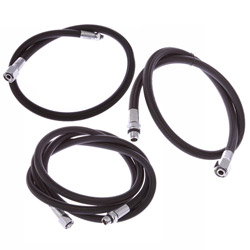 |
 |
|
Typical LP and HP pressure hoses |
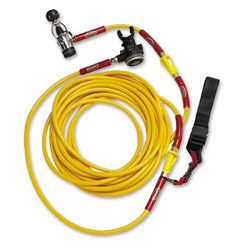
A scuba hookah hose |
Typical scuba hoses are available in short lengths
usually around a meter with connectors at either end. Since you will
need a longer hose for your launcher you will need to connect a scuba
hose to your longer air line. Unless of course you use a number of
adaptors and connect the short hoses together. Long scuba hoses are also
available called "hookah" hoses that allow you to connect directly
to the LP port but are less common and more
expensive.
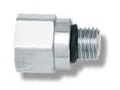
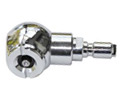
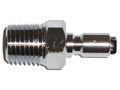
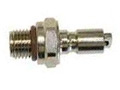
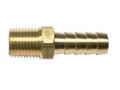
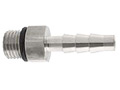
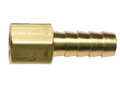
Hose Adaptors
Hose adaptors come in lots of different varieties, and
which ones you use will depend on your specific set-up. Here are just a
few
examples of the different kinds of adaptors you may find useful when
connecting to scuba gear. Use your
favourite search engine to find the adaptor you need. In some instances
you may need to use a couple of adaptors to get the desired conversion.
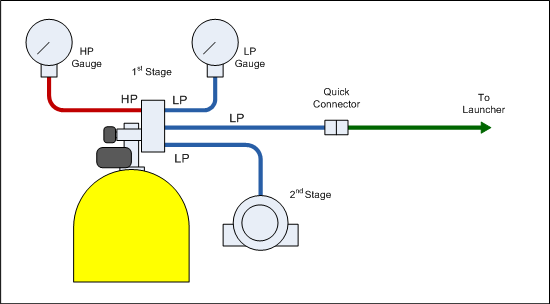
Putting it all together
When setting up your air supply you have several configuration
options to choose from depending on your preference and what equipment
you may already have. Here are some suggestions for connecting your
scuba tank to your launcher:
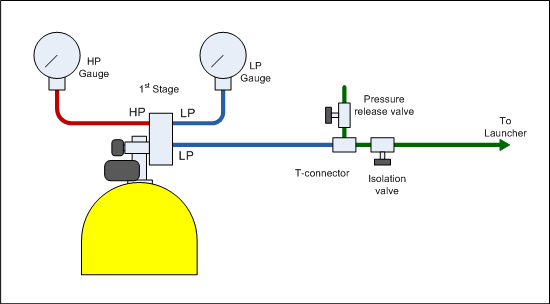
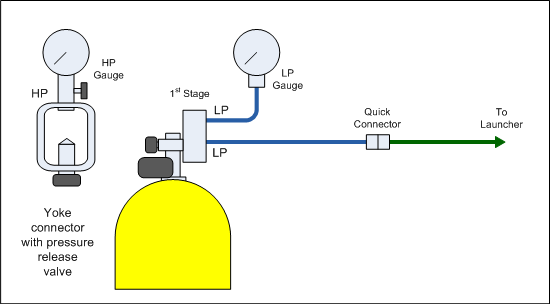
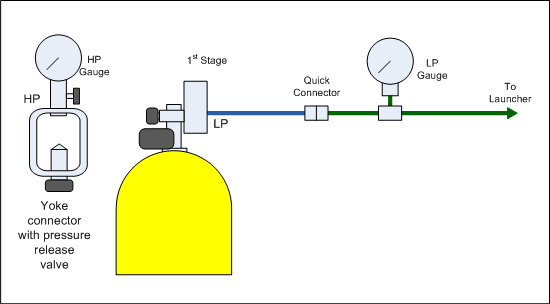
Blue represents LP scuba hoses,
Red represents HP scuba hoses, and
Green represents other air hoses
that are a part of the normal launcher.
The quick connectors referred to here are the kind used to connect
to a Buoyancy Compensator (BC). They have an internal valve that closes
when disconnected.
| Option A 1st stage regulator with a LP gauge,
hose with quick connector and 2nd stage connected to 3 LP
ports. A HP gauge is connected to a HP port on the 1st
stage.
To measure the HP pressure you need to disconnect the
quick connector, and then open the tank. After taking a
reading, press the purge button on the 2nd stage to release
the pressure. |
 |
| Option B
1st stage regulator with a LP gauge and hose with hose
adaptor connected to 2 LP ports. A HP gauge is connected to
a HP port on the 1st stage.
The LP hose is connected to a manifold with a pressure
release valve and an isolation valve. These could be any
kind of valves and may be present on the launcher already.
To measure the HP pressure, you need to close both the
isolation valve as well as the pressure release valve and
open the tank valve. After taking a reading, close the
tank valve and then open the pressure release valve. Open
the isolation valve for normal launches again. |
 |
| Option C 1st stage regulator with a
LP gauge and hose with quick connector connected to 2 LP
ports. A HP gauge is connected to a HP port on the 1st
stage. The LP gauge has an integral pressure release valve.
To measure the tank pressure you need to disconnect the
quick connector, and then open the tank. After taking a
reading, release the pressure by opening the release valve
on the LP gauge. |
 |
| Option D 1st stage regulator with a
LP gauge and hose with quick connector connected to 2 LP
ports.
You can use a separate pressure checking gauge to check
the tank pressure. In order to do this you must first
disconnect the 1st stage from the tank valve. |
 |
| Option E 1st stage regulator with a
hose with quick connector connected to 1 LP port.
This option is useful if your launcher is already
equipped with LP gauge.
You can use a separate pressure checking gauge to check
the tank pressure. In order to do this you must first
disconnect the 1st stage from the tank valve. |
 |
NOTE: When setting up your own configuration keep the
following in mind: To take a HP reading you need to open the tank valve to allow the
full tank pressure to reach the HP gauge and at the same time you need
to isolate the rest of the system to prevent air escaping. After you
close the tank you need to use a pressure release valve to depressurise
the connection between the tank and the HP gauge. If you fail to
include a pressure release valve in your design you will have a really hard time removing the
regulator from your tank.
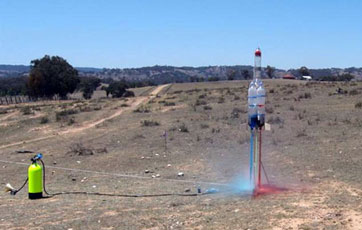
Pressurising your rocket
When you have everything connected, you are ready for launch. Because
the intermediate pressure set on the regulator may be too high for your
rocket, you can fill your rockets to lower pressures simply by opening
the tank valve slowly and letting the pressure build up in the launcher and
rocket. You need to be looking at your low pressure gauge. When the
pressure reaches the desired level, turn the tank valve off.
CAUTION: If you don't turn the tank valve off when the rocket reaches
the desired pressure, the pressure will continue to build until it reaches
the regulator's IP setting. This pressure may exceed the burst pressure
of your rocket and/or launcher. The same thing would happen if you fail
to turn off your compressor when it reaches the desired pressure.
With a diaphragm type 1st stage you can preset the pressure to a
lower value so that it is at the desired launch pressure. You can then
open the tank valve and air will stop flowing when the set pressure is
reached. Then you can turn the valve off again.
Before you launch your rocket, always make sure the tank valve is
turned off so you don't waste air.
How many launches do you get out of a tank?
The number of launches you can get out of a single tank depends on
several factors such as the tank volume, the capacity of rockets you are
launching and the pressure at which you launch them. The calculator
below will give you a rough idea on how many launches you can
expect.
* Note: You can use bar values instead of psi values as long as
both are in the same scale. (you cannot mix bar and psi)
How much does it cost?
The prices for the entire setup can vary greatly
depending on what components you have already and what components you
need to buy. If you are a scuba diver and already have most of the
components then the cost should be minimal. If you are starting from
scratch then it will cost a little more. I would highly suggest looking
for good bargains on e-bay or similar websites. If the equipment is in
working order there is no need for it to be brand new for our
application. Here are some prices to give a general indication of the
cost of some of the components:
| Component |
Approximate Price Range of second
hand components
(in $AUD) |
| Scuba tank |
$50-$300 |
| 1st stage regulator |
$20-$80 |
| HP gauge & hose |
$20-$70 |
| LP gauge & quick connector |
$30-$50 |
| LP hose with quick connect |
$5-$10 |
| 2nd stage |
$10-$50 |
| Hose adaptors |
$2-$10 |
The above are prices for individual components, but you
can often find good deals on e-bay that sell the 1st stage, 2nd stage,
BC inflator hose and HP gauge for $100. This would be a regulator that's
a few years old, but perfectly suitable for water rockets. All up
if starting from scratch you should be able to get a system up and
running for $200-$300 using second hand components. Although this may
seem quite a bit to start off, when you think about the cost of a good
quality pump or compressor it isn't that much more.
How much does it cost to re-fill a tank?
This will again depend on
your location but here in Australia it is about $5-$10 for a fill. Check with
your local dive shop how much they charge.
Getting tanks filled
Depending on your location it may be difficult to get your tank filled,
or you may have to drive a long way. Also depending on the specific
filling station they may require you to have a dive certification card
(c-card) before they will fill your tank. Talk to the owner about what
you want to use the tank for and that it will not be used for diving. In
some cases they may ask you to sign a waiver. You may also be able to talk to
your local paintball center and
ask them if they could recommend where to get them filled. Paintball
centers will often use scuba tanks to re-fill smaller paintball tanks.
You may also be able to find a friend who is a scuba diver and have them get the tanks filled
for you.
Tips
-
Before deciding to get a scuba tank make sure you
have a filling station nearby and is willing to fill your tanks if
you don't have a c-card.
-
When buying a second hand scuba tank make sure that
it had been inspected recently and that it's test date is still
valid. If it's past it's test date, you may need to have it tested
before a filling station will fill it for you.
References
28 / 7 / 2012
|