Building a Water Rocket Launcher
A water rocket launcher can be as simple or as complex as
you like, however, most launchers share common features.
This article describes the different components and their
function to assist you when designing your own
launcher. We provide links to examples of the various features.
Safety
Safety should be your number one priority when designing
your launcher. As your launcher will be handling compressed
air it is important to make sure all fittings are properly
rated. It is always better to err on the side of caution and
use heavier duty components as weight isn't an issue like it
is on a rocket.
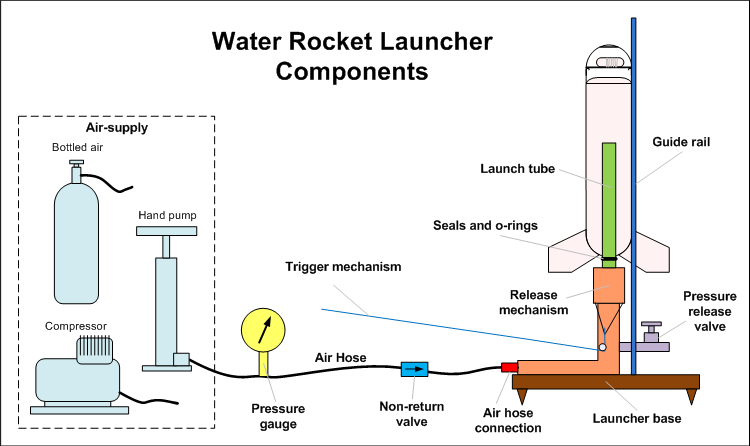
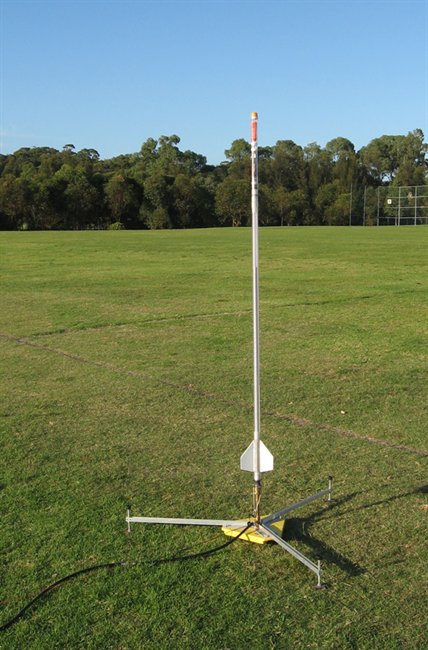
The image below shows a typical water rocket launcher
setup.
Click on the different components in the image for
more information:
Index
Air Supply
Your launcher needs to be connected to an air supply.
There are several different kinds of air supplies you can
use with the same launcher so it is best to incorporate into
your design a way to connect to different supplies as you
upgrade.
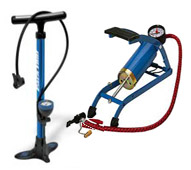 |
Bicycle
pump / car tyre foot pump - This is the easiest
and least expensive way of pressurising rockets. The
launcher's air hose connection will need to have a
tyre valve adapter in order to connect the bicycle
pump directly. Regular pumps can supply in the order
of 100-120psi. More expensive models can supply
100's of psi. |
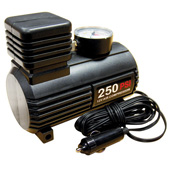 |
Small
compressors - These require a power source such
as mains or a battery. These make filling much less
work, but watch out for cheap models as they can
easily overheat and fail. These are less portable
due to their power needs. Small compressors will
typically go to about 150psi. The larger the
rocket and higher pressures will mean the compressor
needs to run longer and will more likely
overheat. |
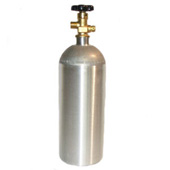 |
Bottled
air with regulator - This is a more expensive option for
filling your rockets, but it is the only option for
using gasses other than atmospheric air. This option
can also typically deliver higher pressures compared to normal bicycle pumps and small
compressors. You can also fill your rockets quicker
as long as air compression heating is taken into
account. Depending on the size of the tank and the
rocket's capacity you can get from dozens of
launches to over a hundred from a single fill.
Commonly used tanks include scuba, Nitrogen and CO2 tanks.
Depending on the type of tank you use, you may also
need certain certifications in order to have them
re-filled. DO NOT use combustible gasses in water
rockets for obvious safety reasons.
Note that extra care needs to be taken when
handling and transporting bottled gasses due to the
higher pressures involved.
Here is a full article on how
to use scuba tanks for your launcher. |
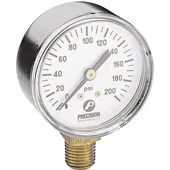
Pressure Gauge
You will need to have a pressure gauge attached to your
air supply line. The pressure gauge measures the internal
pressure of your rocket. It is important to know what the
rocket is pressurised to so you don't exceed the rocket's
burst pressure. It is also a useful tool when checking for
leaks.
The gauge is best located away from the launcher to allow
you to clearly see it without being too close to the
pressurised rocket. Be aware that the pressure may be
slightly different during pressurisation when the gauge is
located away from the rocket. Allowing the pressures to
equalize within the launcher, rocket and air supply hose
should give the correct reading. The delay in pressure
equalization is usually due to small air holes often used in
the hoses and its fittings. Water in the hoses can also
cause the gauge to give a delayed reading as the water moves
through the small holes.
The pressure gauge should cover the range of launch
pressures you intend to launch your rocket at. 0-200psi is a
typical range for regular rockets. Pressure gauges are often
already attached to the air-source so there is usually no
need to attach them separately.
Air Hose
The air hose and its connectors should be rated for the
intend launch pressures. The hose should also be long enough
for you to stand at a safe distance from the launch pad.
 You
may be able to locate a small compressor close to the launch
pad with a short hose, and control it electrically remotely.
Seeing the pressure gauge at distance can be an issue. You
may be able to locate a small compressor close to the launch
pad with a short hose, and control it electrically remotely.
Seeing the pressure gauge at distance can be an issue.
The smaller the inside diameter of the hose the better as
you don't waste energy pressurising a larger volume of air
in the hose. A smaller internal diameter usually also means
the hose should be able to withstand higher pressures. Air
hoses can be purchased at a local retailer that sells
compressors. If you are only launching at 100psi or less
then a garden hose is a viable inexpensive alternative.
Air Hose Connection
Having a built in air hose connection allows you to
disconnect the air-supply from the launcher itself.
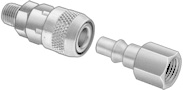 This
makes it convenient for transportation. The type of
connection you decide on will depend on your choice of air
hose and the air manifold/hose on the launcher. The most convenient connections are quick release ones. This
makes it convenient for transportation. The type of
connection you decide on will depend on your choice of air
hose and the air manifold/hose on the launcher. The most convenient connections are quick release ones.
Here are a number of examples:
If you are connecting a bicycle pump to the launcher, you
can make a simple adaptor to connect it. It involves using
an old tyre valve taken from an inner tube and inserting it
into the launcher's hose. Then using a pair of hose clamps
to seal it all up.
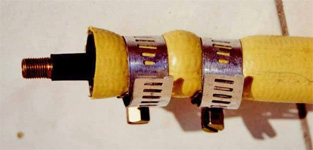
source:
http://wrockets.trib-design.com/index.php?project=nick&page=other_launchers
If you are trying to connect different sized hoses
together, or even extend the same size hose you can use hose
barb adaptors such as these:

Examples:
You again would use a hose clamp over the top to secure
the hose on the adaptor.
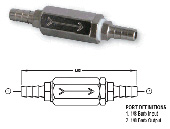
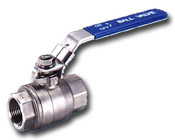
Non-return valves
Non-return or check-valves are used in
launchers to prevent water from flowing back down the air
hose. These can take many different forms. You should locate
your non-return valve as close to the rocket as possible to
keep as much water in the rocket as possible.
Here are a couple of cross sections of typical non-return
valves. One way flow is from left to right.
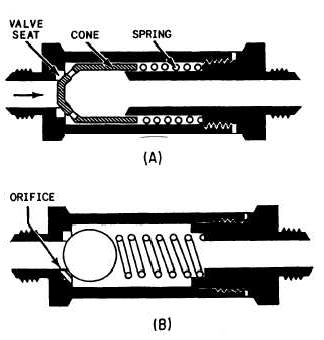
Some one way valves come equipped with hose barbs, which
makes them very easy to attach to your air hose.
Here are examples of commercially available check-valves:
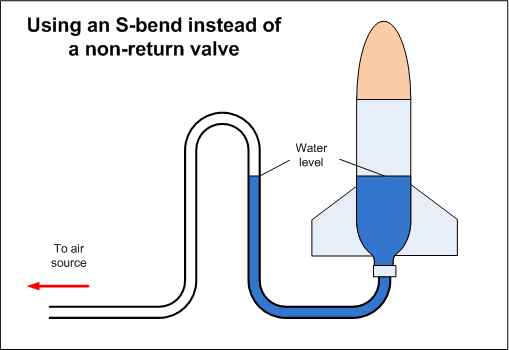
An alternative to using a non-return valve is to use an
S-bend in the air hose whose curved section is above the
water level in the rocket.

If your launcher uses a launch tube that emerges above
the water level inside the rocket then you don't need a
non-return valve.
Launcher Base
The launcher base provides a
stable framework to attach all the components to. The
launcher base should be designed to be stable and prevent
the entire rocket from tipping over when the launch string
is pulled or due to wind gust. This can be a flat board,
tripod, or any arrangement of pipe work.
Here is a typical
launcher base made from PVC piping:
http://monsterguide.net/files/2009/03/water-rocket-launcher.jpg
Here is one made from a piece of plywood:
http://www.aircommandrockets.com/images/day56/Day56_water_rocket_06_s.jpg
It is also useful to anchor the launcher to the ground
with a couple of tent pegs to prevent it from sliding when
pulling on the launch string.
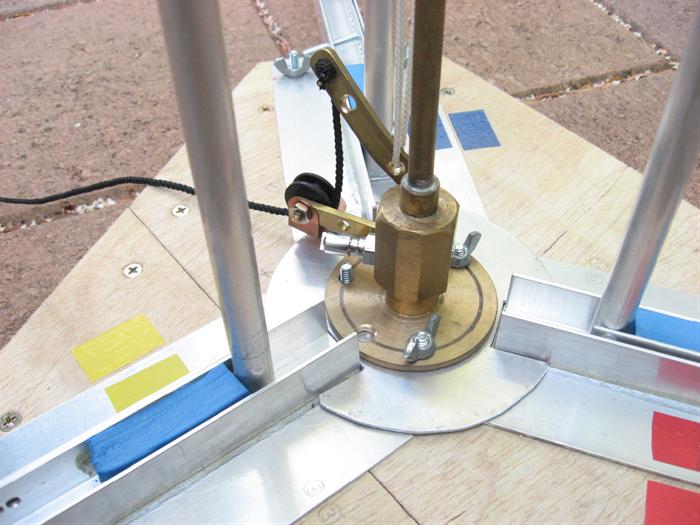
Release Mechanism
The most
important part of your launcher is the release mechanism. It
is the locking mechanism that prevents your rocket from
leaving the launcher while it is being pressurised. Some
common release mechanisms include:
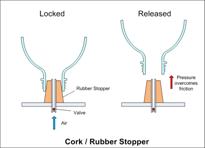
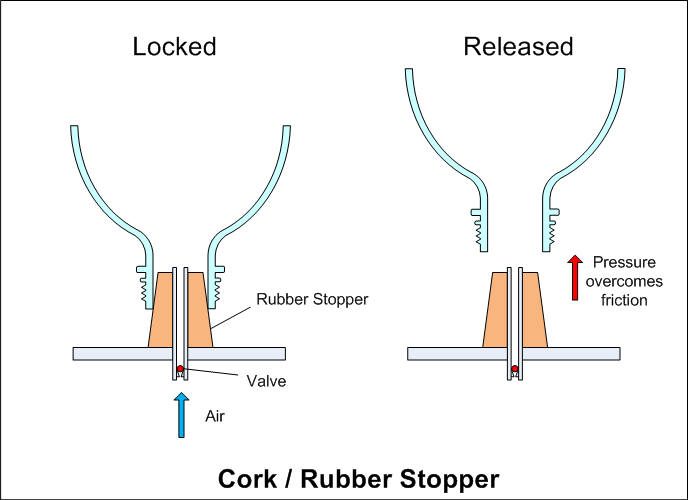
Cork/Rubber Stopper
A cork or a rubber stopper is
inserted into the neck of the bottle. Friction between the
cork and the rocket keeps it on the launch pad as the rocket
is pressurised. When the internal pressure exceeds the
frictional force the rocket is released. It is difficult to
predict when launch will occur. Although these are very
simple to make they are only suitable for fairly low
pressures. These will also give inconsistent results
depending on how hard you push the rocket onto the cork.
Examples:
|
 |
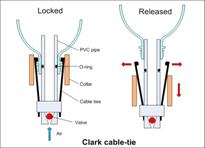
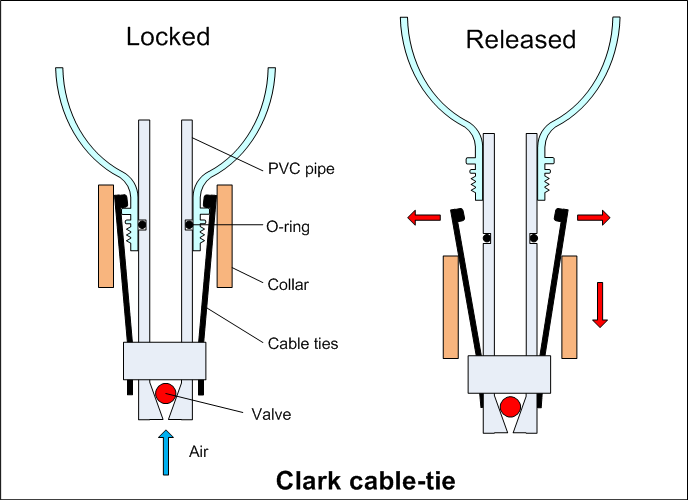
Clark cable tie launcher
A very popular launcher
named after Ian Clark who developed it. It uses cable
ties to hold down the rocket while it is being pressurised.
A collar surrounding the cable ties keeps them in place.
When the collar is lowered the cable ties open releasing the
rocket. This is typically used with fully open nozzles.
There is a huge number of Clark Cable Tie launchers
described by various rocketeers available on the net. Here
is just a few:
A variation on the Clark cable tie launcher are these
copper tube launchers that seal from the outside.
|
 |
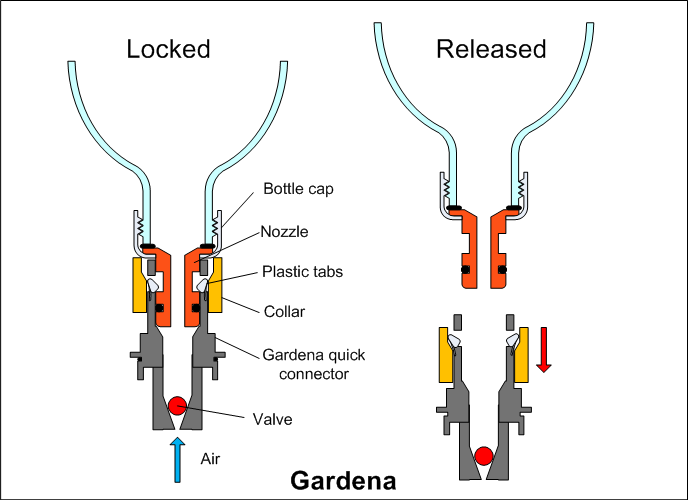
Gardena quick connector
Another popular
launcher that uses a garden hose quick connector to hold
down the rocket. The rocket is equipped with a matching
nozzle made from a garden hose adapter. Typical nozzle sizes
include 9mm and 15mm. The Gardena launcher is used
frequently for reduced nozzle sizes. You can insert/glue
smaller tubes inside the nozzle to reduce the nozzle size
even further.
Here are some examples of Gardena launchers:
|
 |
Twisting bolt
A bolt is mounted vertically in the base with a
section of the head removed. When the bolt is rotated into
the locked position the head holds the rocket down by the flange
of the bottle. Turning the bolt allows the head to release
the flange.
Examples: The first of these is a twisting bolt
variation:
|
 |
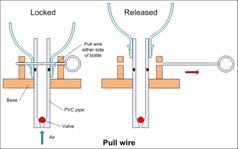
Pull wire
The pull wire launcher is based on a
similar principle to the twisting bolt mechanism, but the
bottle is held down by the flanges on either side of the
bottle with a strong wire. To launch the rocket, the wire is
quickly pulled free to release the rocket.
Examples of pull wire launchers:
|
 |
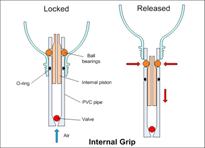
Internal grip
This is not a very common design mostly
due to more advanced construction techniques required. This
launcher holds the rocket down by the internal walls of the
rocket. In the above example a set of ball bearings are used
to retain the bottle. These are held in the locked position
when the internal piston is in the up position. Lowering the
piston allows the ball bearings to retract into the launch
tube releasing the rocket. There are a number of variants
based on this launcher design.
Another variant incorporates a compressible
rubber stopper that uses friction against the inside
of the bottle neck to both seal and retain the
rocket. Examples:
|
 |
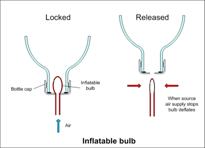
Inflatable bulb
This launch system was developed by
Antigravity Research.
http://www.antigravityresearch.com/HTMLobj-1195/This_Cant_Be_a_Launcher.pdf
It is a very simple mechanism that has a flexible bulb
fitted on the end of the air hose which is then inserted
into the nozzle. The bulb has a tiny hole in it. As air
pressure is applied the bulb swells preventing it from being
ejected and the rocket is filled through the tiny hole. When
pumping is stopped the pressure starts to equalise and the
bulb shrinks until it is small enough to fit through the
nozzle and then is ejected launching the rocket. It is
difficult to predict when the bulb will release though. This system is only suitable for small rockets due to the
size of the nozzle. Once you start filling, there is no
launch abort option. |
 |
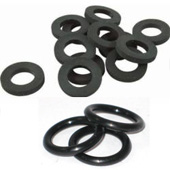
Seals and O-rings
To prevent the pressurised air and water from leaking out
of your rocket you need to use a washer or an o-ring between
your rocket and the launcher.
 The type that you use will
depend on the type of launcher you are using. The higher the
pressure you want to use, the tighter the tolerances have to
be for the o-ring grooves. Always make sure that the o-ring
grooves are clean and free of scratches or burrs. Always use
correctly sized o-rings. The type that you use will
depend on the type of launcher you are using. The higher the
pressure you want to use, the tighter the tolerances have to
be for the o-ring grooves. Always make sure that the o-ring
grooves are clean and free of scratches or burrs. Always use
correctly sized o-rings.
Examples:
Rubber washers are also commonly used when sealing
rockets against the launcher. These can be typically
purchased from the hardware store. In an emergency if you really need to
make a specific sized one they can be cut from sections bicycle inner tubes.
Pressure release valves
 It is a good idea to add a safety
release valve to your launcher. Sometimes it is important to
abort a launch and safe the rocket after it has been
pressurised. How this is achieved will depend on how you
configure your supply connection and where you locate your
non-return valve. The pressure release valve needs to be on
the rocket side of the non-return valve otherwise you won't
be able to release the pressure from the rocket. It is a good idea to add a safety
release valve to your launcher. Sometimes it is important to
abort a launch and safe the rocket after it has been
pressurised. How this is achieved will depend on how you
configure your supply connection and where you locate your
non-return valve. The pressure release valve needs to be on
the rocket side of the non-return valve otherwise you won't
be able to release the pressure from the rocket.
Here are some examples:
Trigger Mechanisms
Trigger mechanisms are actuators that
actually start the launch. This is typically a string
attached to the release mechanism to release the locking
lever.
 |
Pull String
This is by far the most common and easiest way to launch
your rocket. The string simply connects to the release
mechanism and when it is pulled the release mechanism
activates. If the release mechanism takes a bit of force to release
you may consider using a
lever arm to help with the
activation without putting undue force on the launcher. Too
much pulling force on the launcher
could make it topple. Make sure the string is long enough to
launch the rocket from a safe distance.
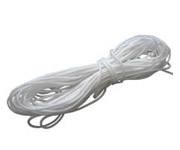
The best kind of string to use is a braided nylon string.
Thin or cheap strings can easily break.
|
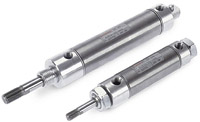 |
Pneumatic/hydraulic
Air or water pressure can be used to activate a
pneumatic/hydraulic piston to activate the release mechanism.
These systems are not very common mostly due to the added
expense and complexity.
|
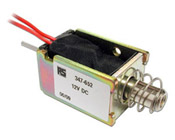 |
Solenoid
Like the pneumatic or hydraulic pistons an electrical solenoid can provide
the required force to activate the release mechanism. These
also are not very common due to the need for a separate
power source. Use only low voltage ones. You don't want to
mix mains voltage and water.
Example:
|
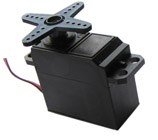 |
Servo
Larger
servo motors can also be used to activate the release
mechanism. They have the advantage that they do not need a
lot of power like the solenoid, and when connected to a
receiver can be controlled through a remote control.
Example:
|
Stability
A launcher needs to have a stable base. If the
launcher is not stable it could topple when the launch
string is pulled or due to a wind gust. The last thing you
want is a fully pressurised rocket pointing horizontally.
Make sure you either have a wide base on your launcher or
that it is pegged into the ground, preferably both. If it
is not pegged to the ground you may find that the launcher
may slide as you pull the string. A couple of tent pegs is
usually enough to secure the launcher.
Portability
When designing your launcher keep portability
in mind. Is it light enough to carry a fair way to the launch site
from your car? Make sure you
can easily fold it down so that it fits in your car.
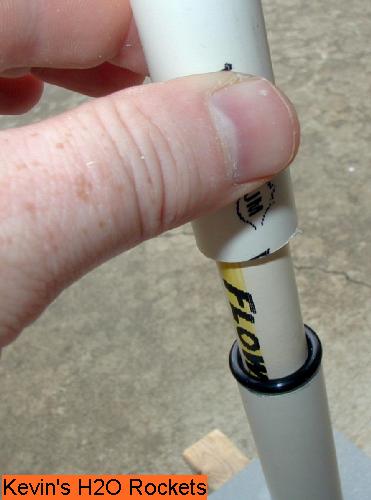
Launch tube
Adding a launch tube to your launcher can
improve the performance of your rockets. The launch tube
ideally should be as long as possible. The diameter should
be slightly smaller than the nozzle you are using. This will
minimize water loss as the rocket accelerates up the launch
tube. If the launch tube is permanently attached to your
launcher, you will be limited with the types of rockets you
can fly and what nozzles you can use. Consider making a
removable launch tube if you want to experiment with various
rockets.
Example:
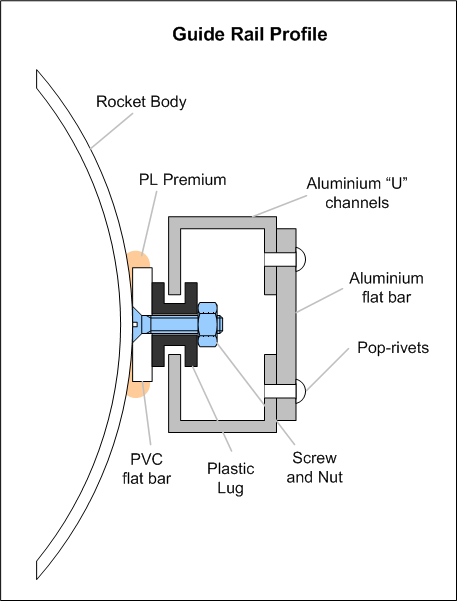
Guide rails
Guide rails are very important in helping
your rocket fly vertically especially during the first part
of the flight. The guide rail keeps your rocket moving
straight before the rocket has enough air speed for the fins
become effective. There are different types of guide rails
you can choose from:
 |
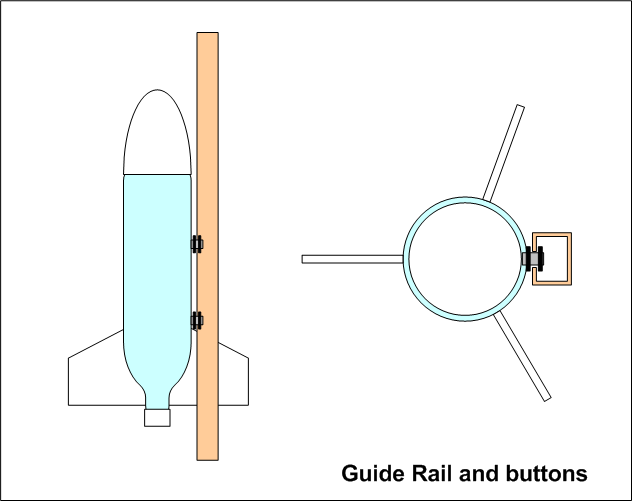
Guide Rail and buttons
These are suitable for larger
rockets and consists of a single slotted rail. The rocket is
fitted with rail buttons that slide into the rail groove.
Examples:
|
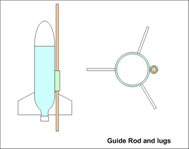 |
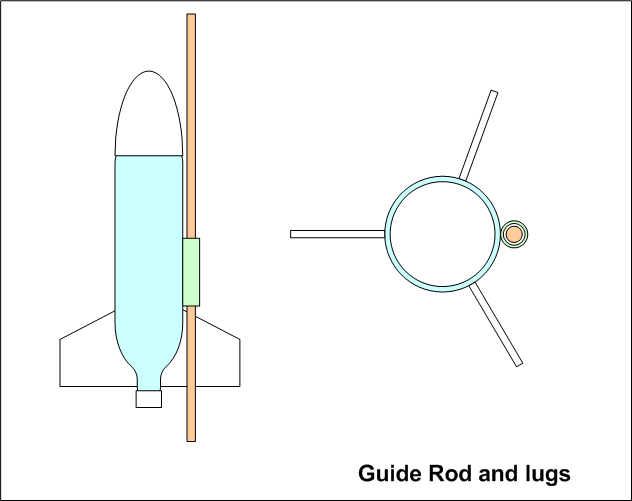
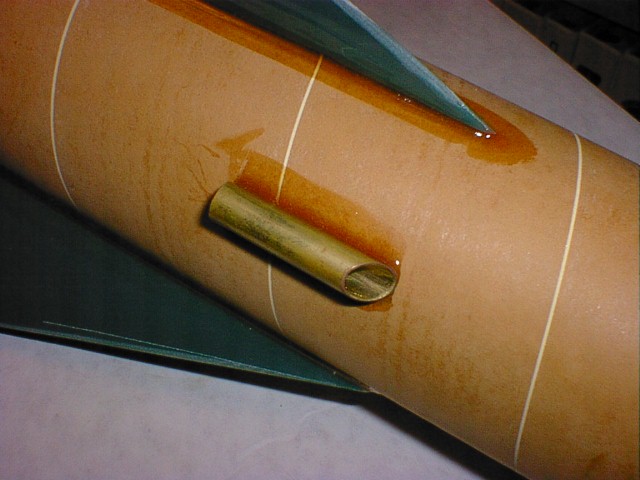
Guide Rod and lugs
The guide typically consists of a round
steel rod securely attached to the launcher. The rocket is
fitted with small lugs or short tubes that slide over the
rod. These are very common in model rockets. These are
generally suitable for smaller rockets.
Examples:
|
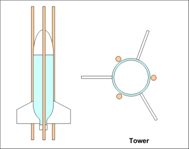 |
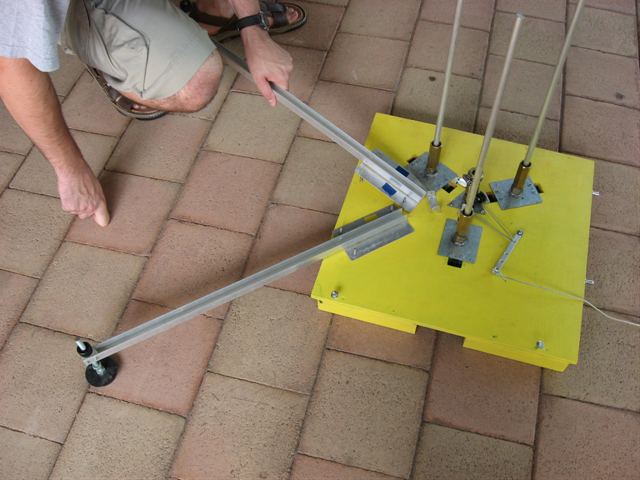
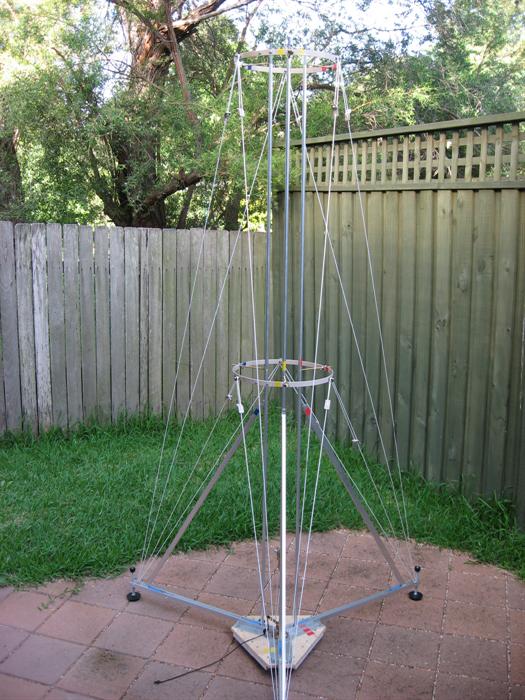
Tower
This launcher arrangement includes 3 or 4 guide rails
surrounding the
rocket without the need for the rocket to use rail buttons.
The lack of rail buttons saves weight and drag on the rocket.
If you are building a tower launcher incorporate into
your design a way to adjust the spacing so that you can put
in different diameter rockets.
Examples:
|
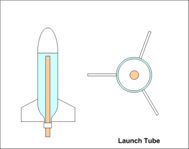 |
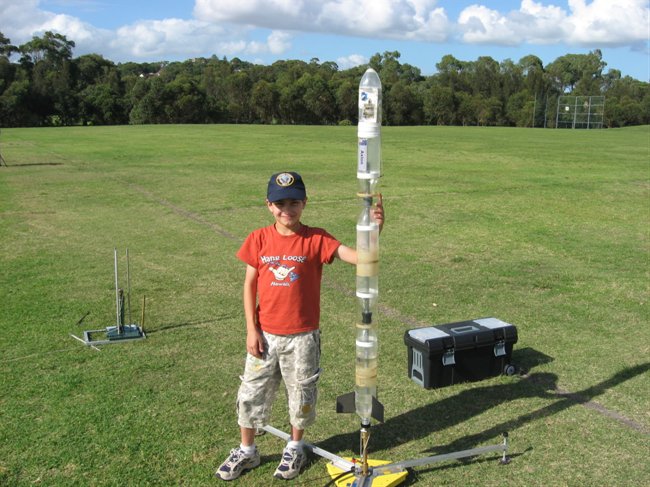
Launch tube
For certain rockets you can use the
launch tube itself as a guide rail. The rocket does not need
additional guide rails.
Examples of rockets using a launch tube as a guide rail:
|
When deciding on your guide rail arrangement think about
the types of rockets you will want to fly from your launcher
and in particular their fin arrangements. If you are using ring fins, make sure the release
mechanism will fit through the ring fin. If you are using
regular fins then make sure they will not get caught on any
part of the launcher. If you are going to use a tower
launcher then you need to consider the fin count and whether
they will all fit between the rails.
Materials
When making the launcher keep in mind that it
will get soaked from repeated launches. Stay away from
materials like MDF and chipboard which love to soak up
water. Use materials that can withstand typical outdoor
conditions. Plastic and metal are the best.
Testing
Test your launcher the same way you test your
rockets. When testing it to new pressures for the first
time use a hydro test and stand well clear and listen & look
for leaks.
Make sure you fix any leaks on your launcher. A rocket
can depressurise quite quickly while waiting to launch even
if there is a small leak.
Water Supply
A launcher can have an integrated water
supply for the rocket. This means you put the rocket dry
onto the launch pad and then fill the rocket while it is on
the pad. Pressurised air is usually used to force the water
from a reservoir into the rocket. This is typically done
prior to filling the rocket to full operating pressure. A
small bicycle pump is usually all that is necessary to force
the water into the empty rocket. A valve is needed to
isolate the water reservoir before pressurisation can begin.
Examples:
Usage Tips
- When you launch a rocket, dirt and mud can be kicked up
under the launcher and contaminate various components.
Always make sure the release mechanism and launch tube are
clean before each launch. Sand on the launch tube can be
enough to wedge a rocket so it won't fly off.
- Use silicone grease on all moving components of your
launcher. This prevents things from sticking and ensures
smoother operation. Also grease your o-rings to prevent them
pinching when fitting your rockets onto the launcher.
- Some materials degrade when exposed to UV radiation
from the sun. If you are using these materials in your
construction make sure you store your launcher out of the
sun when not in use. The little bit of exposure the launcher
gets during your launch days shouldn't be an issue.
- As you use your launcher, repeated pressurising cycles
can work-harden some components and eventually cause them to
fail. Inspect your launcher after each launch day for signs
of hairline cracks.
- When designing the entire launcher consider how you
will place the rockets on the launcher. If you fill the
rocket with water first, then how easy will it be to place it
on the guide rails? Will you be able to reach the release
mechanism easily to lock your rocket in?
- If you are using a string to launch the rocket, make sure you use a strong string that is not going
to break. The best kind of string to use is a braided nylon.
- Don't use MDF or chipboard to make the base out of, as
these will absorb a lot of water and warp and perhaps fall
apart. Use only water proof materials.
- The type of release head your launcher uses will depend
on your rocket design and chosen nozzle types. If you plan
on flying lots of different rockets with different nozzle
types, you may want to consider making swappable release
heads for your launcher.
References and other launcher examples:
There are about as many launchers as there
are water rocketeers. Here are just a few examples of their
work:
|


