Ruben from the Yahoo water rocket forum posted a link (http://groups.yahoo.com/group/water-rockets/message/10369)
to a site that sells very cheap MD-80 clone
cameras. Having used the original MD-80 camera for a
while, the opportunity to get a similar
camera was too tempting and so for $20
including delivery it arrived 9 days later.
Though it didn't come with the microSD card,
it did come with some good accessories like
the USB charger, cable and mounting
brackets. For testing I ended up using the
microSD card from the MD-80.
The camera is similar in shape to the
original MD-80 although it is a little
larger. The image quality and frame rate are
quite good. The case is plastic which makes
it about half the weight of the original
camera. The camera only weighs ~20grams.
One of the biggest drawbacks of the
camera is the permanent time stamp overlay
on the video. There is currently no easy
solution for removing the time stamp from
MD-80 clone video as it is embedded in the
video stream by the camera's firmware. There
are various software post processing tools
available to either crop or try to eliminate
the timestamp. There have been filters done
before for
VirtualDub namely the logoaway
one (http://voidon.republika.pl/virtualdub/ladocs301/logoaway.html ) but it is a more
general filter. Here is a video of the logoaway filter at work:
http://www.youtube.com/watch?v=Rgw7SNooD8w
I thought I'd have a go at writing a
custom VirtualDub filter to try to
specifically remove the time stamp as much
as possible from the video. The filter is
called Timestamp Remover and is
now available for download from here:
Version 1.4 - Added loading
and saving of settings to a
file. Thanks to Dave Porter for
suggesting to add this feature.
Source code is available on
request if you are interested in
extending or improving the filter.
Notes:
It still needs further tuning
especially against deep blue sky, but
otherwise it should be usable for most
videos.
I make no guarantees on how it will
perform on any specific video. It has a
number of configurable parameters that
should help optimize its performance. I'm
always happy to hear suggestions for
improving it or any bug reports.
If green blocks appear in the
timestamp window, that is currently a
beta debug feature. It represents that
not enough passes have taken place. It
will be removed in the final release.
What can you expect
from the filter:
The filter will NOT produce perfect
results and completely eliminate the
timestamp. The filter is designed to remove
as much of the timestamp as possible to
prevent it from being a distraction while
watching the video. It attempts to preserve
as much of the original data in the video.
But the approach it takes is rather
simplistic in order to be fast within
VirtualDub. A number of artefacts will
always be present. If the viewer focuses
specifically on the timestamp area you will
be able to see some of the artefacts. If
however the viewer looks at the content of
the video the artefacts are mostly
unnoticeable.
The filter seems to perform better on
fast moving action than in stationary shots.
Therefore the filter is more applicable when
filming action from moving objects.
Installing the
filter:
Copy the timestamp.vdf file to
the \plugins directory of the
installed VirtualDub directory. The filter
will be automatically loaded when you start
VirtualDub.
Using the filter:
In VirtualDub from the Filters menu
select "Timestamp Remover"
You can change the parameters for
the filter if you like, but they are
currently set to the MD-80 clone
defaults. The filter window settings
simply set the position of the filter
over the timestamp. For best results
this should be as small as possible and
extend a couple of pixels past the outer
bounds of the timestamp. The font colour
range is set to the colour of the font
used in the timestamp. (Yellow for MD-80
clone) The pixels in that colour range
within the filter window will be
processed and replaced.
Load the original AVI file with the
timestamp into VirtualDub
Export the file as normal.
The filter should be usable for
other similar videos from keychain or gumstick
cameras, but has not been tested on those
yet.
In the following video only the
in-flight video segments were shot with
the MD-80 clone and these used the filter.
Making the MD-80 clone's LEDs easier to
see
The status LEDs are hard to see through
the microphone grating and its even worse in
broad daylight. Here is how to fix it: Open
the case (unscrew the 4 little screws) and
use a Dremmel tool or file to cut away a
part of the case exposing the LEDs. They are
actually quite bright underneath. Here are some photos of the results:
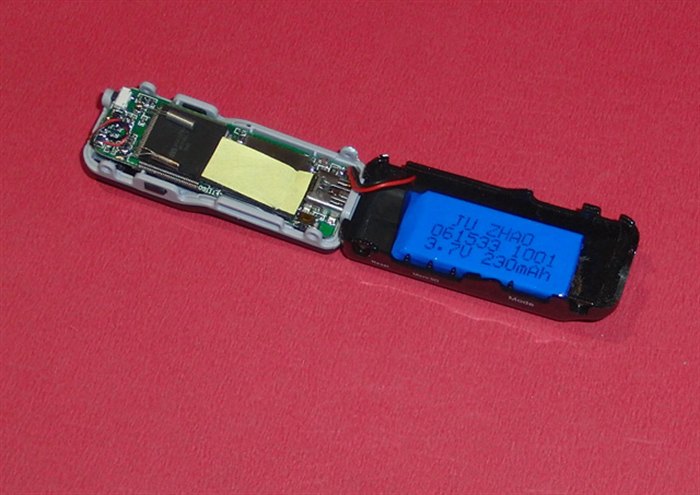
When you remove the tiny screws the
camera easily swings open.
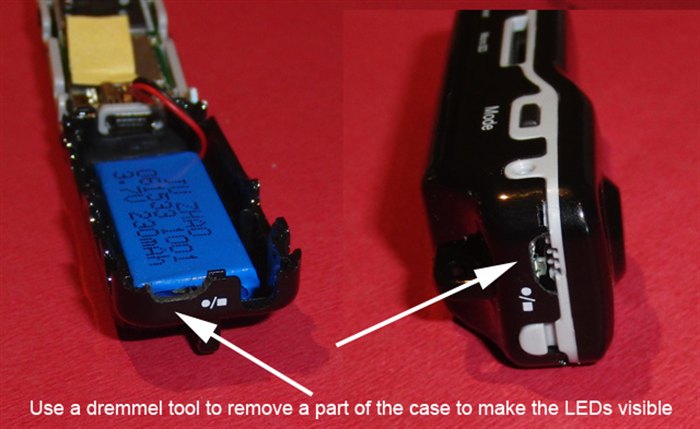
Remove a part of the case with a Dremmel
tool. It's right next to the mic.
You now have much brighter LEDs
in order to see
what mode the camera is in.