Each flight log entry usually
represents a launch or test day, and describes the
events that took place.
Click on an image to view a larger image, and
click the
browser's BACK button to return back to the
page.
Day 42 -
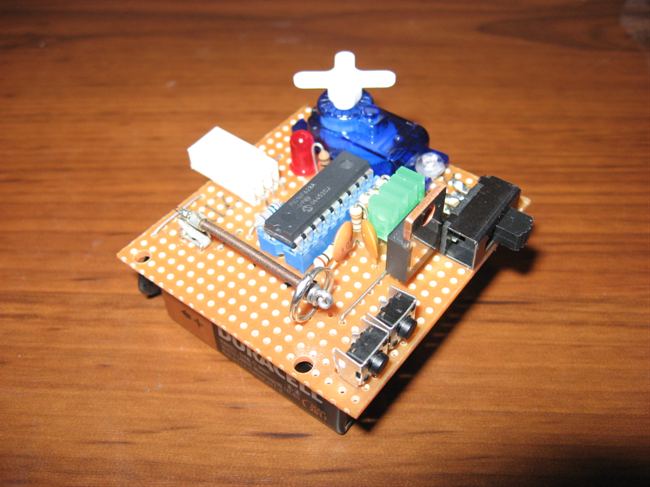
Development Progress, Hyperon Standard Platform
V1.3.2 of the flight computer. The servo is
now attached directly to the PCB.
The flight computer now sports a more
compact launch detect sensor.
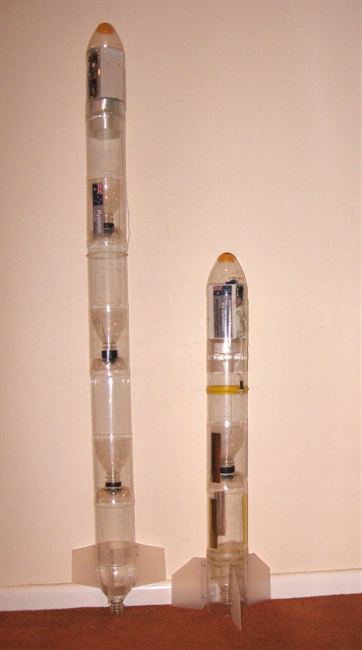
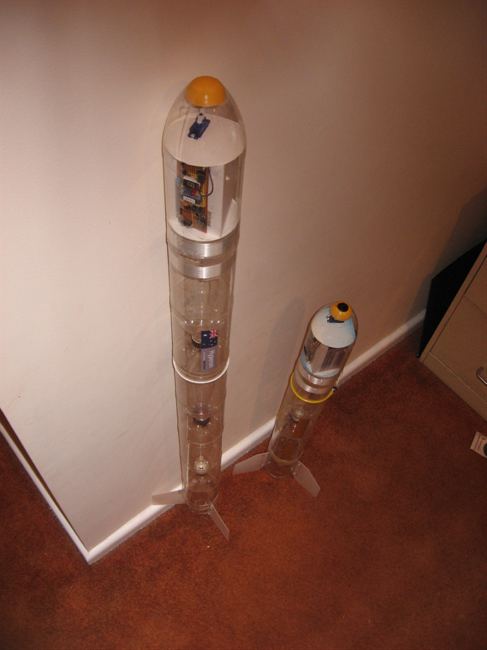
Hyperon rocket next to Tachyon II sustainer.
Hyperon uses V1.3.1 of the flight computer.
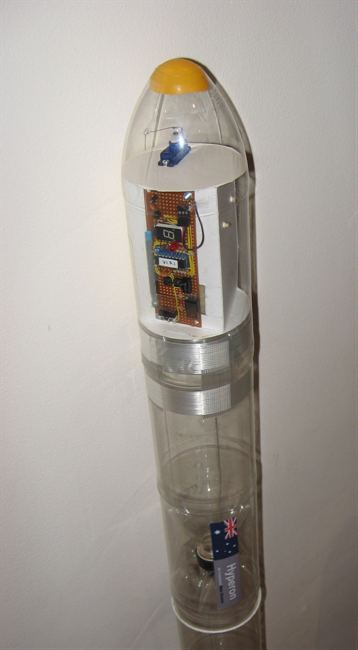
A different view of the Hyperon rocket.
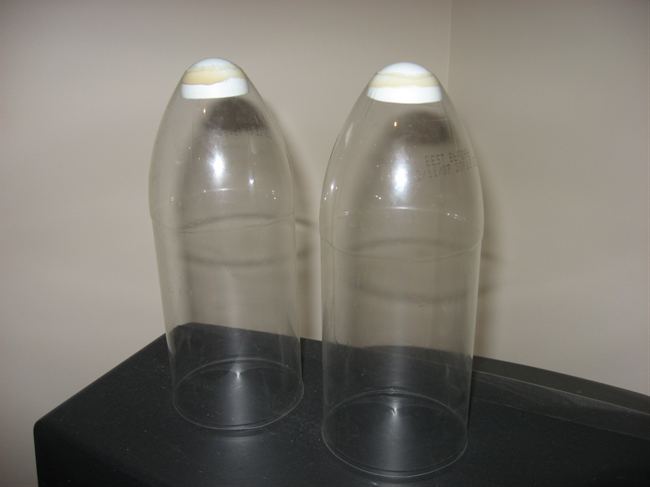
Spliced pairs of bottles for upcoming
booster experiment. The far one has been tested
to 100psi, the other two are still to be tested.
New nosecones for V1.3.2 of the flight
computer. One will be used on J4 II.
Date:14th
August 2007
Location:Workshop
Conditions: Pleasant, since it
was indoors.
Rockets:Hyperon, Acceleron IIIb
We have been spent the last two weeks catching
up mostly on non-rocket related stuff, but
we are now getting back into development
again. We
have been working on a number of
different projects.
Current Developments
Acceleron IIIb
The booster has been inspected and
cleaned after the last set of launches. We
will likely fly it again when we buy a
logging
altimeter since we would like to know how
high its sustainer can fly. We want to use
the altimeter to give us feedback on various
design changes we make. It is too difficult
to evaluate performance when you can't see
the rocket well, and total flight time only
gives us a rough idea.
We also spent
time analysing the video footage from
different cameras to see how the two stage
rocket performed:
It looks as if the stage separation
was taking place a little later than we
would have liked. The booster was already
slowing down when the release happened. This
can be seen at the top of the flight path as
the booster starts pitching over. Since the
release sequence is initiated by the
pressure switch, we will need to make the
pressure switch activate at slightly higher
pressure. We can adjust the tension on the
spring of the TDD, or alternatively add
slightly less water to that segment with the
pressure switch. Less water means that the
segment will stop producing thrust slightly
sooner compared to the other two segments
that are still accelerating the rocket.
We now have a better idea of the time it
takes to get to apogee and hence can set the
parachute deploy delay for the sustainer
appropriately. The parachute deployed about
2.5 seconds after passing through apogee
from the videos.
The parachute deploy delay for the
booster will be shortened as even the
minimum setting allowed by the software on
the day wasn't quite enough. This is just a
software upgrade.
After release the booster looks like it
falls more like a back-gliding rocket. It
actually saved us a whole lot of work after
the first launch since the parachute
deployed so late. This flight profile was
visible in all three flights before the
chute opened. This is actually a
favourable feature because if the parachute
fails the rocket should land at a lower
speed
than if it was going nose first.
New Flight Computers
We continue to incrementally develop the
flight computer. With this latest iteration
V1.3.2 we have tried reducing the footprint and
weight, as it is still a little too large
for our liking. The flight computer
including the actuating servo now weighs 29
grams (excluding battery).
After investigations into suitable
batteries a few weeks back, I have bought a
number of
CR123A's. These are lithium
batteries with a great power rating of
1300mAh which is more than we need (twice
that of a 9V battery), but need two of them
to make up 6V. The two batteries still
only weigh 32 grams compared to 46 grams for a
9V that we have been using recently. The
increased power capacity means we will be
able to also power from the same batteries
other experiments we are
planning. With normal usage the batteries should also last longer
compared to the 9V ones.
They each cost around AUD$3 online in
Australia, but I picked up a pack of 12 on
e-bay for
AUD$1.38 each including delivery.
The new flight computers are smaller
in size and so can be mounted horizontally in
the nosecone. This allows us to shorten the
length of the nosecone section further
reducing weight.
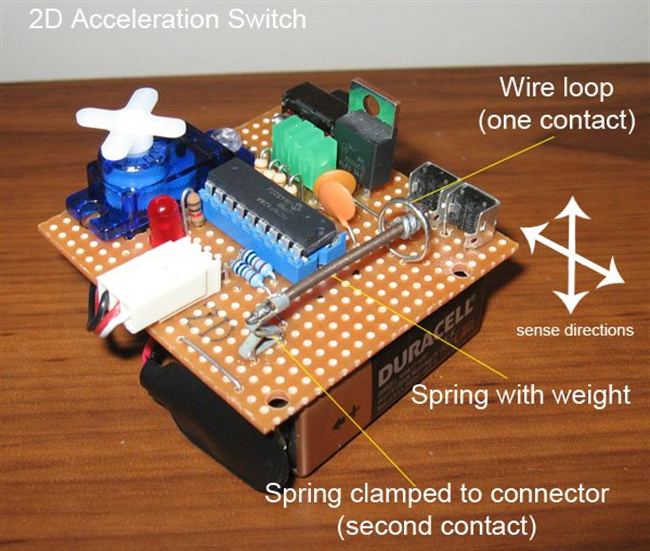
The flight computers also have a new launch detect switch
which allows it to work in two dimensions.
This allows you to mount the PCB in a range
of orientations. (See photo on left)
The spring is the compressed type which
prevents it from oscillating while you are
handling the rocket or there is slight
vibration on the launch pad after the system
has been armed.
These types of springs can be found in
various equipment such as old tape players,
printers, CD players and the like. We use a little bit of
solder wrapped around the end of it to
provide a weight.
The other end of the spring is just clamped
to a piece of a connector and that is
soldered to the PCB to provide both
mechanical and electrical contact.
The activation force can be adjusted by
varying the length of the spring, the weight
on the end, and the size of the loop of
wire (the other contact).
Full details of the flight computer are
now available
here.
J4II Upgrade
J4II is having an upgrade done to its
parachute deployment system. Until now it
has used the NOAA technique, but with
limited success and more often than not the
parachute has been deploying too early. J4II
is now being fitted with a similar
deployment system to that of Tachyon, but
with version 1.3.2 of the flight computer.
The total weight of rocket will remain
roughly the same.
The fins have also been replaced with new
ones held down by large rubber bands. The
last set of fins had become misaligned over
time. Since they were taped on, and likely
had contributed some of the less predictable
flight paths.
New Hyperon Standardised Platform
We are going to be doing a number of
experiments and needed a modular rocket with
standardised components so we can change them
depending on the experiment. The platform is
based on 1.25L 90mm diameter bottles. These
are easy to get everywhere, can hold a
reasonable pressure and are easy to work
with. The rocket can have bottles added or
removed easily to change the capacity.
This modular design allows the rocket
components to also be interchanged between
other rockets should they become damaged.
A 5L rocket (Hyperon) has been constructed this
week that adheres to this standardised
model. Most of the components for it came
from other rockets so it was relatively easy
to put together. (The Tachyon sustainer also
adheres to this standard.)
Hyperon uses the removable fin assembly
design to allow for easy modification.
Upcoming Experiments
Some of the upcoming experiments to be
done with the Hyperon platform are:
Baffle flights. A few months back we
static tested a baffle on the lowest
coupling to prevent the blow through
effect, but haven't evaluated its
performance in flight yet.
Nozzle tests. We want to fly a 15mm nozzle on a
larger rocket.
A new booster design - A simplified
booster design for smaller rockets. We
spliced together a number of bottle
pairs this weekend that will serve as a
basis for this booster design.
A new compact and lightweight staging mechanism
has been designed that is not based
on the Gardena or Crushing Sleeve methods. It
is based on a
different principle altogether. If the
design works, it should enable simple
construction of multistage rockets.
We currently have about another 10
engineering and science experiments in various stages of
development that we
will cover in future updates.
Construction Details
Over the last few months we have had a
number of requests asking about how we make
various components for our rockets. So we
are going to start making a number of videos
that show how we do things as it is much
easier then trying to describe them in words.
The first one this week is of our Robinson
coupling: