Date: 18th
November 2007,
6:30am - 8:30am
Location: Denzil Joyce Oval
Conditions:
20 degrees C, Easterly at 0-10km/h,
cloudless sky
Team Members at
Events:
GK, PK, Paul K, John K
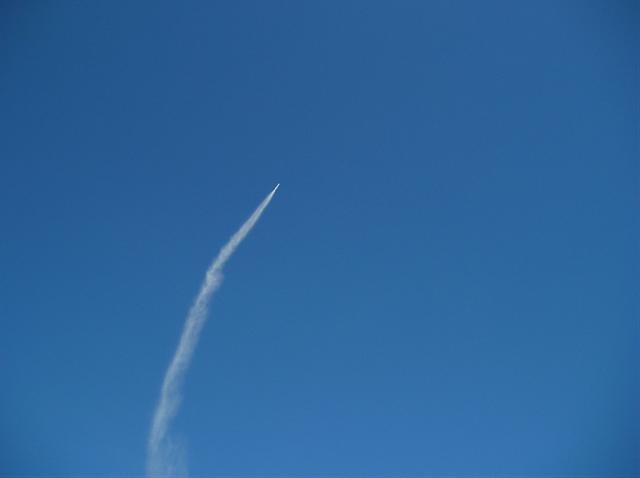
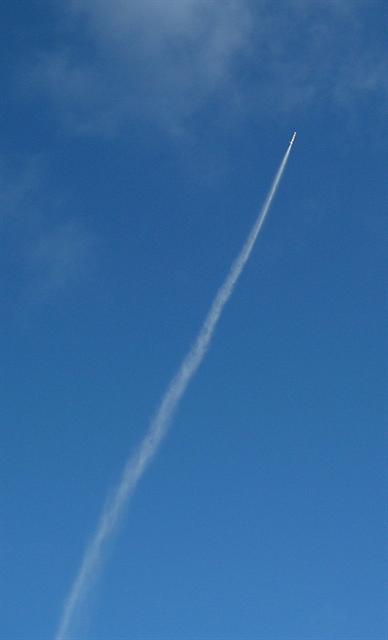
We had an excellent day of launches this
weekend. The weather was ideal with very
little wind and well behaved rockets. On
this day we were able to finally fly
multiple flights to compare foam and
water-only using altimeter data.
Flight Day Events
Foam vs. Water-Only
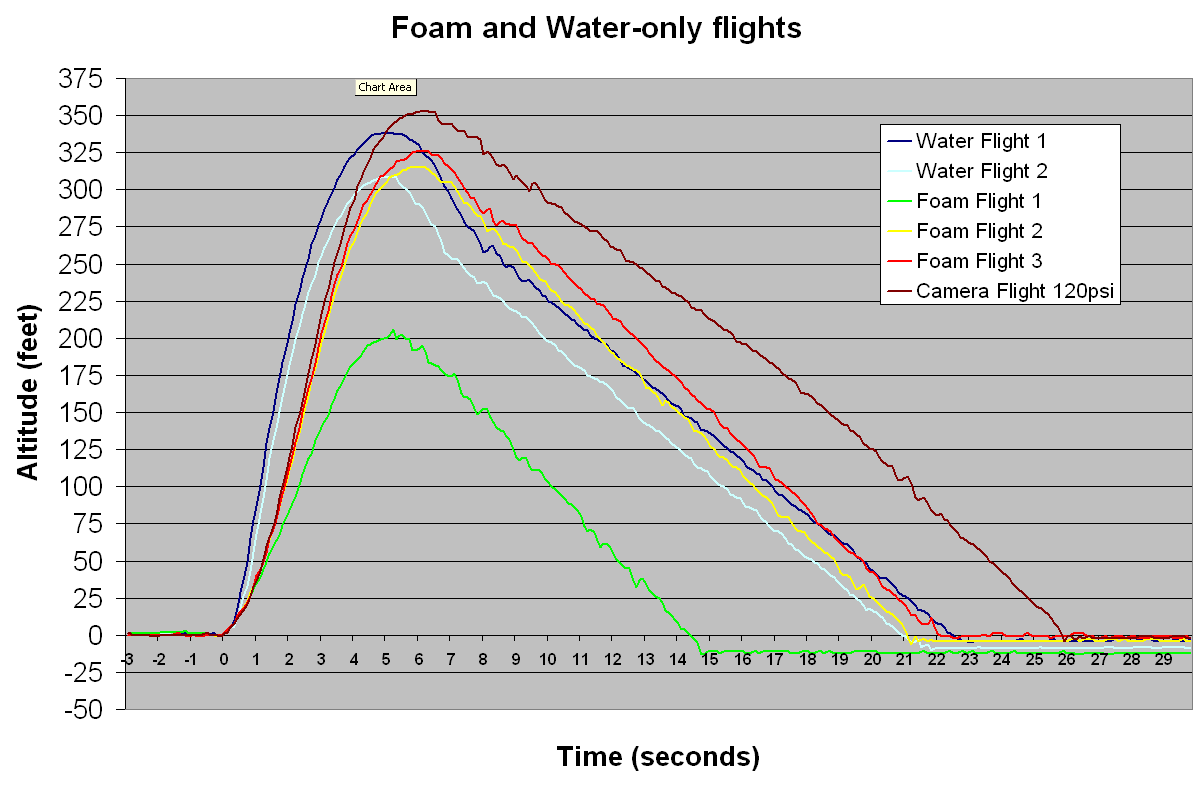
Here are the results of the comparison
flights for the day. The data was exported
from the altimeter software and imported
into Excel where the data was aligned in
time and
altitude offsets adjusted. The only difference between
the flights was that bubble bath was added
to the water for the foam flights. The pressure, capacity, nozzle
size and weight all remained the same.
The rocket parameters:
| Capacity |
5.3 Liters |
| Pressure |
110 psi (7.6 bar) |
| Nozzle |
Straight through 9mm |
| Width |
90 mm |
| Weight |
537 grams |
| Water |
1.25 Liters |
Observations
While these tests are by no means
conclusive, we did learn a couple of
interesting things.
- Water-only altitudes were 338
and 308 feet, although on video
review of the second water-only
flight it didn't go quite as vertical so
the average between the two is closer to
330 feet.
- The two valid foam flights were
316 and 326 feet and both
were quite vertical. The average was
321 feet.
- This means that foam resulted in
2-3% less altitude.
- The simulation predicted altitude
for water only was 320 feet
(Taking a guess at the drag coefficient
and nozzle efficiency values).
- This implies that foam has less
performance, however, after the last foam launch I capped the
rocket so the residue foam would not leak out in the
car. Hours later when the residue foam condensed
back into water I was surprised to find that
there was approximately 80ml of water in
the rocket. That is at least another 80
grams that had to be carried to that
altitude.
This amount does not include all the water that drained out of the
rocket on the way down and when we
carried it back to the launch pad. There may have been
perhaps just as much or more water still left in the
rocket when it reached apogee that did not
contribute to the thrust as a reactive mass!
- This means that the foam powered
rocket lofted
another perhaps ~150 grams. This
represents ~12% total water mass!
Simulations predict a water-only rocket
with 150 grams more should achieve only
~ 246 feet compared to 321'
foam flight. (23% more)
- The question now is how do we make use of
all that dead weight during the thrust
phase?
- From previous
thrust measurements we found that
foam had 14% less total impulse,
however, this only resulted in 2-3%
less altitude. Most of this is likely
due to the reduced drag on the rocket
because it travels slower for longer.
If we can improve the total impulse for
foam, and utilise the extra dead weight
we are likely to be able to improve the
altitude ... more experiments needed we
think.
- The noise in the altimeter data on
descent is likely due to the parachute
door flapping near the altimeter port
hole.
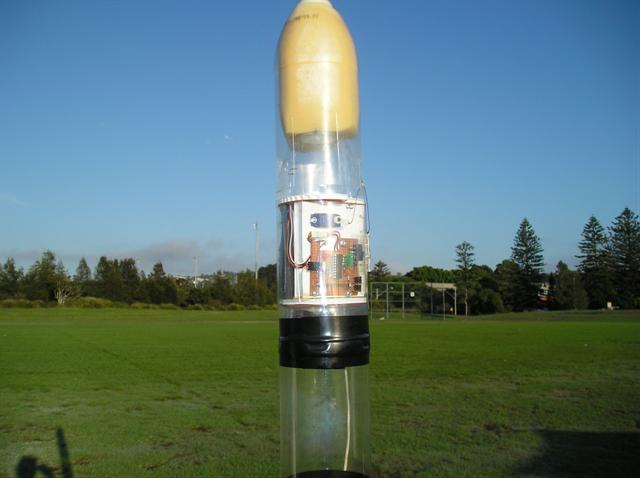
Flight Computer Progress
Development on the new flight computers
is also progressing well with most of the
design now finished. And software still
needing to be completed. The new flight
computer will have a remote control for
setting and arming so that no one needs to
be near the rocket. It will also completely
control the altimeter's recording. Supporting two separate
RC servos it can control staging and parachute deployment,
or a drogue/main parachute combination. A
small speaker is included to provide audible
computer state
information.
We will publish full details again once
this is complete and flight tested.
I also discovered a design issue with the
existing flight computers when powering them
from 6V. The voltage regulator voltage
wasn't being regulated to the desired level
because the input voltage was not high
enough. When powered by a 9V battery there
was no issue. Instead of the 5V we were
getting only 4.35V which was still enough to
power everything but meant the servo wasn't
achieving its full power potential. This
issue has now been resolved.
Crushing Nosecone
After destroying a number of payloads
over the last few months, we wanted to redesign the nosecone
and payload section so that if a parachute
failed to open, the payload would have a
reasonable chance at surviving the impact. On
the
water rocket forum
Richard and Cliff
had some good suggestions how to go
about it. Speeds of 150-200km/h are typical
on impact.
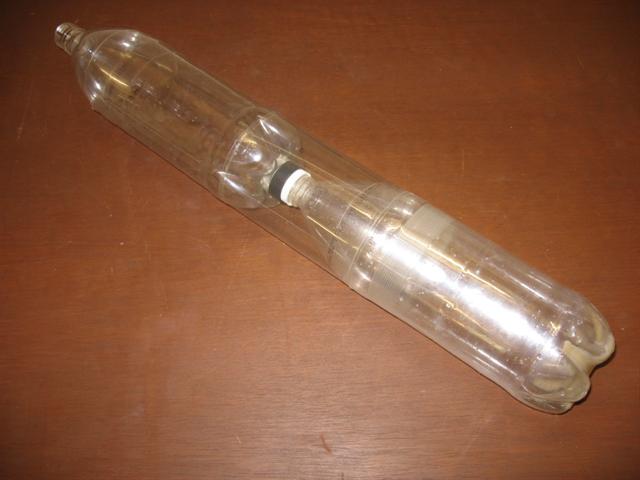
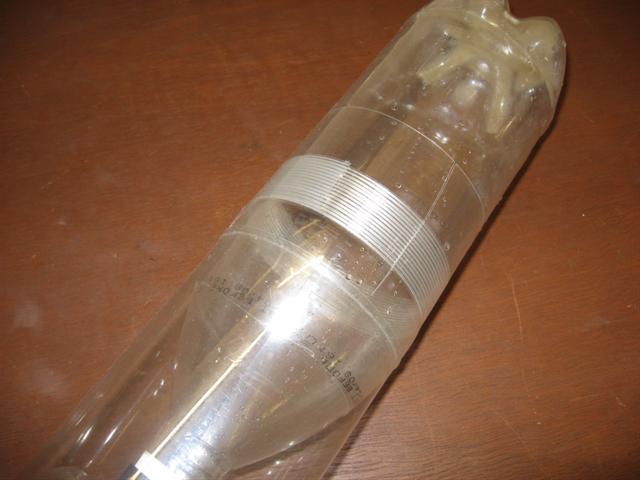
The shock absorbing nosecone design we
finally settled on is an extension that
tapes onto an existing payload nosecone. It
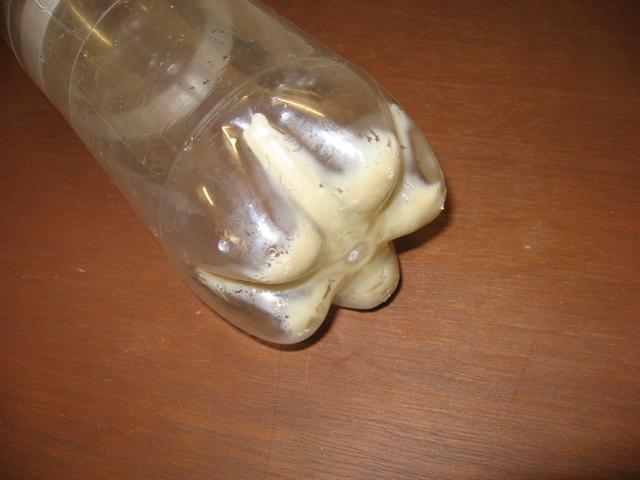
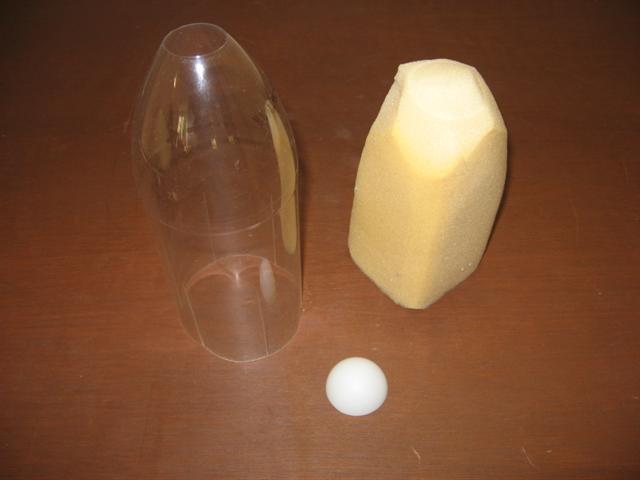
consists of a aerodynamic sleeve made from a
PET bottle with half a ping pong ball at the
top to give it the proper streamlined shape.
It is
filled with a block of soft foam. The
sleeve has a number of long slots cut along
its length to allow it to open up during
impact. The foam inside the sleeve is
designed to compress against the existing
nosecone. Because the nosecone extension can
move it will also compress the air inside it
against the existing nosecone further
helping to absorb the shock. When that
reaches its limit the existing payload nosecone will
also crush further absorbing the shock.
On impact there will still be significant
damage to the nosecone, but the payload
components should be reasonably well protected.
The altimeter is also housed in its own foam
padding.
This nosecone extension weighs 37grams
and can be easily removed when flying high
performance missions, and put back
when doing tests or other experiments.
We have now flown 7 missions with this
nosecone extension, but thankfully we
haven't needed to use it yet.
The layout within payload section has
also been redesigned, with the battery now
in the middle of the bulkhead "V" behind the
parachute and the RC servo is now mounted
sideways just above the flight computer.
Both are much more securely attached.
The parachute attachment point has also
been moved further up the rocket so that it
always lands tail first. This reduces the risk of damage to
the payload section when landing under
parachute.
Bottle Reinforcing
During the week we had another go at
reinforcing bottles to take higher
pressures. We have tried this technique
before but the last tests were only
for a single bottle and due to problems with
the pressure test setup we didn't quite achieve what we wanted. There was also a
slight issue with one of the outer sleeves
sliding off.
This time around we have improved how the
sleeves fit and can no longer slide off.
This test also included joining together two
reinforced bottles with a Robinson
coupling, because ultimately we want to
build higher pressure multi-bottle rockets.
We did a hydrostatic pressure test on the
two joined bottles up to 200psi. We held it
there for about 20 seconds and let the
pressure out. There were no leaks and upon
close inspection we found that there were no
visible stress marks around the bases or
necks of the bottles. This was very
encouraging as it means that the bottles
could have probably held at least 230psi+.
It also means a launch pressure of at least
200psi can be used.
Detailed steps of the reinforcing
procedure are now in the
construction section.
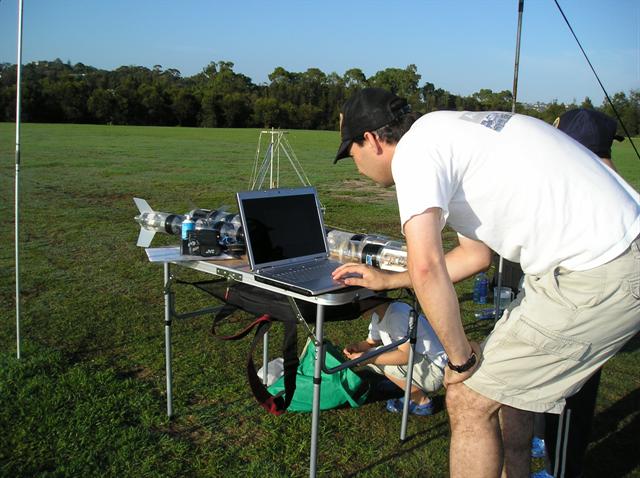
Misc
We have expanded the ground support
equipment we bring to the launch site. Dad
made a portable sun shade that goes up
quickly, and we now also bring a fold up
camping table. The table makes it easier to
work on rockets.
I also purchased a new
laptop last week so that we can have a
computer at the launch site for downloading
videos from the in-flight cameras, and
downloading & viewing altimeter data as
well. Eventually we will be able to
make flight computer software changes in the
field. The computer can run
simulations on the spot so we know what to
expect with rocket configuration changes before launch.
Normally these
really aren't an issue when launching at the
local park, but as we plan on launching more
powerful rockets, we will need to go a lot
further from home and launch events will
take up most of a day instead of one or two
hours.
Goals
Our goal in the medium term is to develop
a fleet of 4 or 5 different rockets and
corresponding spare parts so that we can
continue to do experiments when weather
allows instead of loosing good launch days
to repairs.
A longer term goal is to move to the
higher power rockets and do experiments in
the higher performance range. At this point
in time it looks like the NSWRA (NSW
Rocketry Association) is re-forming and
getting access to great launch sites as well
as the proper permissions from authorities.
When everything is sorted we hope to join in
the new year. Having local contact with
experienced pyro rocketeers will be a great
benefit as many materials, payloads and
recovery systems are very similar in both
rocket disciplines.
Flight Details
| Launch |
Details |
| 1 |
|
Rocket |
|
J4
IV |
|
Pressure |
|
110 psi |
|
Nozzle |
|
9 mm |
|
Water |
|
1.25 L |
|
Flight Computer |
|
V1.3.2 - Setting:
"8" |
|
Payload |
|
Altimeter |
|
Altitude / Time |
|
338' / 22.4 s |
|
Notes |
|
Very good flight,
with good deploy and good landing. |
|
| 2 |
|
Rocket |
|
J4
IV |
|
Pressure |
|
110 psi |
|
Nozzle |
|
9 mm |
|
Water |
|
1.25 L |
|
Flight Computer |
|
V1.3.2 - Setting:
"8" |
|
Payload |
|
Altimeter |
|
Altitude / Time |
|
308' / 20.9 s |
|
Notes |
|
Very good flight.
Flew in a big arc. good landing. |
|
| 3 |
|
Rocket |
|
J4
IV |
|
Pressure |
|
110 psi |
|
Nozzle |
|
9 mm |
|
Water |
|
1.25 L + foam |
|
Flight Computer |
|
V1.3.2 - Setting:
"8" |
|
Payload |
|
Altimeter |
|
Altitude / Time |
|
206' / 14.3 s |
|
Notes |
|
Good flight, long
arc path with very smooth foam
trail. Good landing. |
|
| 4 |
|
Rocket |
|
J4
IV |
|
Pressure |
|
110 psi |
|
Nozzle |
|
9 mm |
|
Water |
|
1.25 L + foam |
|
Flight Computer |
|
V1.3.2 - Setting:
"8" |
|
Payload |
|
Altimeter |
|
Altitude / Time |
|
316' / 21 s |
|
Notes |
|
Excellent foam
flight. Nice and vertical. Very good
deploy and good landing. |
|
| 5 |
|
Rocket |
|
J4
IV |
|
Pressure |
|
110 psi |
|
Nozzle |
|
9 mm |
|
Water |
|
1.25 L + foam |
|
Flight Computer |
|
V1.3.2 - Setting:
"8" |
|
Payload |
|
Altimeter |
|
Altitude / Time |
|
326' / 22 s |
|
Notes |
|
Another excellent
foam flight. Almost identical to the
one above. |
|
| 6 |
|
Rocket |
|
J4
IV |
|
Pressure |
|
120 psi |
|
Nozzle |
|
9 mm |
|
Water |
|
1.25 L + foam |
|
Flight Computer |
|
V1.3.2 - Setting:
"8" |
|
Payload |
|
Altimeter, Camera |
|
Altitude / Time |
|
Unknown |
|
Notes |
|
Very good camera
flight. Altimeter failed to record
flight because I forgot to turn it
on. |
|
| 7 |
|
Rocket |
|
J4
IV |
|
Pressure |
|
120 psi |
|
Nozzle |
|
9 mm |
|
Water |
|
1.25 L + foam |
|
Flight Computer |
|
V1.3.2 - Setting:
"8" |
|
Payload |
|
Altimeter, camera |
|
Altitude / Time |
|
353' / 26.1 s |
|
Notes |
|
Excellent camera
flight. Altimeter recorded good
data. Good landing. |
|
| 8 |
|
Rocket |
|
Graviton |
|
Pressure |
|
120 psi |
|
Nozzle |
|
9 mm |
|
Water |
|
800 mL + foam |
|
Flight Computer |
|
V1.3.1 - Setting:
"A" |
|
Payload |
|
Altimeter, camera
internal to payload, Lego blocks. |
|
Altitude / Time |
|
Unknown |
|
Notes |
|
A very good flight,
but jet foaming was not achieved as
water drained to lowest bottle
before launch. Good landing. |
|
|