|
Date: 19th May 2008
Location:
Workshop
Team Members at Event:
GK and PK.
Repairs
All the plastic retaining tubes have been
removed from the Polaron V main stage. On
inspection one other tube was cracked (other
than those that were shredded) . Because of
the forces involved we didn't want to take
any more chances with plastic, so we
replaced them with thin walled brass tubes.
Although adding a little more weight, they
should be up to the job. We will need to do
some tests first though before giving them
the all clear. We are giving the PL a week
to fully cure. Other than the tube
replacement the rest of the rocket and
boosters are ready to go.
Acceleron has been mostly repaired
with the exception of the staging mechanism.
Over the last month or so we have been
working on yet another staging mechanism,
and with the repairs needing to be done for
Acceleron's stager we decided to
complete it and put on Acceleron IV. We
still have a long way to go with it, and
need to do more testing, but so far the
development has been going well. I will post
full details once it has flown. It is a lot
more compact and lighter than what was used
on Acceleron previously. Since we are
rebuilding the staging mechanism it was a
good opportunity to upgrade the Tachyon
sustainer. We are building a completely new
sustainer that has ~30% more capacity, more
streamlined shape and new parachute
deployment based on V1.5 of the flight
computer. The fin section now integrates a
ring fin with 4 smaller conventional fins.
The ring fin struts are made from 6mm carbon
fiber tubing and act as supports for the
sustainer during the boost phase.
The top part of the pressure chamber
consists of a spliced 1.25L pair of bottles
Robinson coupled to a special 1.25L bottle.
We have a couple of bottles (they don't sell
them anymore) that are very streamlined
ideal for tail cones of rockets. We Robinson
coupled it as opposed to splicing it so that
we can use Jet Foaming in this rocket. The
nosecone also comes from a slightly
different bottle compared to what we
normally use. The nosecone has about a 20%
longer curved section making it more
streamlined. The sustainer will carry both
the altimeter and camera.
22mm Tornado Couplings
I briefly discussed the new tornado
couplings in the
last update.
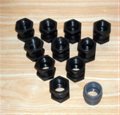
Since then, I ordered 10 of the
3/4" BSP sockets from
Philmac,
but at $4 each they are a little pricey.
They arrived a few days ago and dad
got on the lathe and re-threaded all of
them. By the end he was cranking them out
every 15 minutes. We have 13 couplings
altogether now and want to use them on a
number of projects. An upgraded Acceleron
booster
will need at least 6 of them.
The large bore couplings will enable us
to do two things. Use long launch tubes and
allow us to experiment with bigger nozzles.
The Robinson couplings we have been using
were only 8mm and this caused a choking
effect when used in combination with a
larger nozzle. Having larger nozzles will
allow us to build bigger rockets, as the 9mm
nozzles can only provide a certain maximum
thrust for a given pressure. To lift heavier
rockets we will need to use bigger nozzles.
New Rocket
As the bottles trickle in from friends
and family, we have been making up a
stockpile of the spliced pairs of bottles,
both 1.25L as well as 2L ones. The 2L pairs
use 5 bottles each so that is a lot of
lemonade that has to be processed. 2
bottles make up the pressure chamber, 1
bottle for the splice sleeve and two bottles
are used for the reinforcement rings around
the neck of the bottles. We also use the
cylindrical sections from the last two
bottles to make up the inter-bottle
aerodynamic sleeves.
These spliced pairs work well with the
new couplings allowing us to assemble
various configurations of rockets or
boosters.
We have assembled a new rocket to fly
this weekend using 3 spliced pairs and 3 of
the couplings. The removable fin assembly
was taken from Hyperon and the nosecone and
deployment system are taken from the Tachyon
III sustainer. We pressure tested the rocket
to 130 psi without leaks. The rocket has a
capacity of ~7.5 liters.
FTC tests
In the background we have been working on
some FTC tests. The primary reason for
looking at FTC is that we want to use it to
make some upper stages of rockets. We bought some
T8 6-foot lengths quite a few months ago,
but only now are we getting to doing
anything with them. The FTC only has an
average wall thickness of 0.36mm which is
pretty thin.
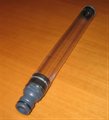
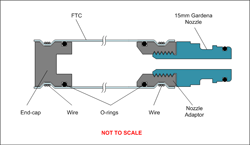
We made an end-cap out of some
PVC we had on hand and the nozzle is
based on a 15 mm Gardena nozzle. The one we
bought from the local hardware store came
with an outside thread. We machined an
adaptor with a matching thread that fits
snugly inside the FTC. We then epoxied the
nozzle inside the adaptor. The seal for the
end-cap and nozzle is provided by an o-ring
that sits against the FTC. Just behind the
o-ring is a groove that allows us to shrink
the FTC into it to hold the end-cap and
nozzle in place. We copied this technique
from
Urie's water rockets.
To secure the end-cap and nozzle we wrap
a couple of loops of thin fencing wire
around the FTC just over the groove. We then
apply heat from a heat gun to the FTC while
applying tensile stress to the wire. This
allows the wire to deform the FTC into the
groove. We then let it cool down and twist
the wire closed.
For the first test we used a 1 foot
length of the FTC and secured the end-cap
and nozzle at either end. When we first
heated the end of the FTC we kind of forgot,
that other parts of the FTC may also get hot
and we ended up buckling a part of the FTC
past the end cap. Oops. Since it was going
to be a pressure test, the slight buckle
didn't worry us. On all subsequent heating
we filled up the FTC with cold water and
that prevented the FTC from shrinking where
we didn't want it to shrink.
We then hydrostatically tested the FTC to
190 psi before the FTC split. We were
happy that the end-cap and nozzle held and
that there were no leaks. One of the nice
things about attaching the nozzle and
end-cap in this way (without glue) is that
we can reuse them for other tests or actual
rockets.
We then hydrostatically tested another 1
foot length of FTC, but this time wrapped
it with one layer of fiber glass strapping
tape. We also added a number of extra wraps
of the tape around each end right near the
o-rings to help with the seal. As we reached
230 psi the end-cap flew out of the FTC. It
looks like the groove in the end-cap was not
deep enough and the wire probably loosened
where it was twisted. This allowed the
end-cap to slide past the wire.
There was no
damage done, and we will reused the same
length of FTC in another test, but this time
with a deeper groove in the end-cap. We want
to see how far we can take the reinforcing.
The single layer of tape added 7grams to the
1 foot length of FTC. I believe Urie's
water rockets filled the outside groove
where the wire is with Epoxy, and this may
be a good way to keep the wire from
unraveling.
Our first goal is a launch pressure of
200psi, so I think it is well within the
techniques we are using for reinforcement
and attachment of the nozzle and end-cap.
Miscellaneous
I bought a new heat gun (Metabo HE2000)
a couple of weeks ago. We've been using a blowtorch for
shrinking bottles until now, but it was
always a bit of a hassle having to light it,
and get refills for the gas cylinder. The
heat gun has good range of temperature
settings and air speeds.
After a couple of months of slow
development the new Flight Computer V1.5
software is almost finished. The full write up
and user manual will be
available on our site shortly.
|


