Each flight log entry usually
represents a launch or test day, and describes the
events that took place.
Click on an image to view a larger image, and
click the
browser's BACK button to return back to the
page.
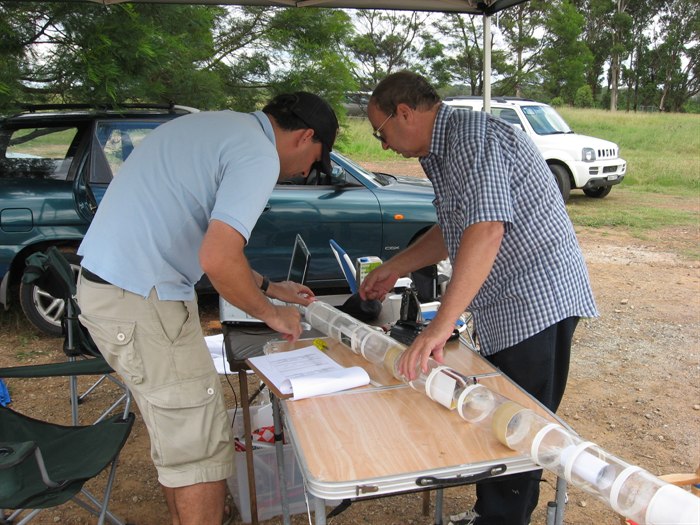
Day 89 - Axion IVb & Craig's flight computer
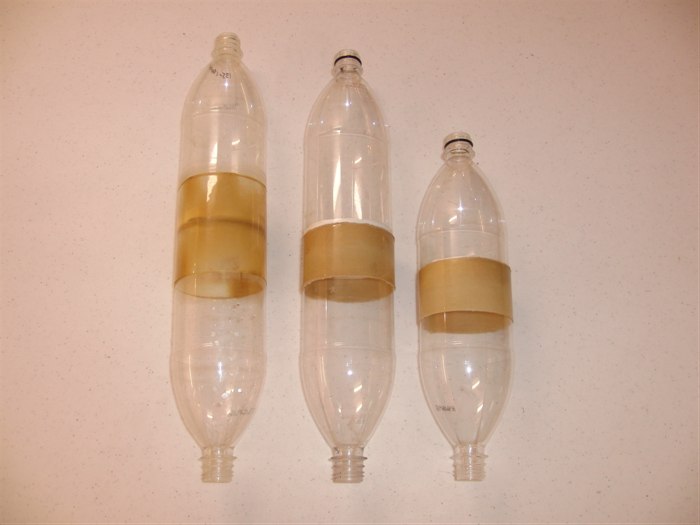
Left to right:
1.Old splice - 2.11L
2.New splice -1.97L
3.Small spliced pair for jet foaming. - 1.35L
Testing jet foaming insert in the Tornado
coupling.
An o-ring popped out during a pressure test
on Acceleron V.
70mAh LiPo batteries that will be used on
the flight computers instead of 9V batteries.
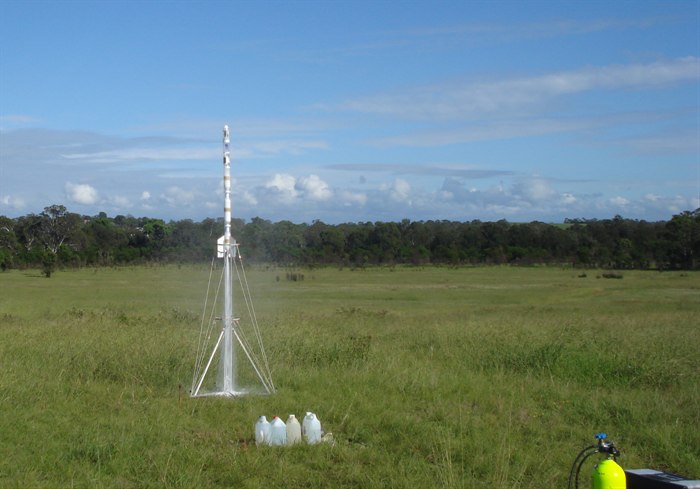
Setting up base camp with new gazebo
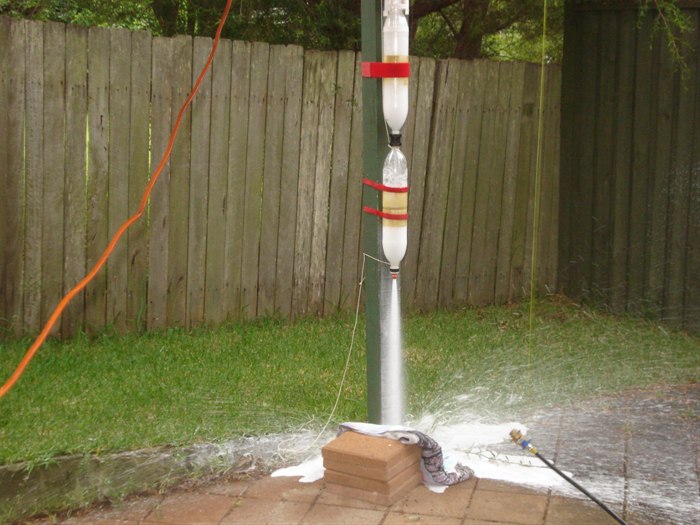
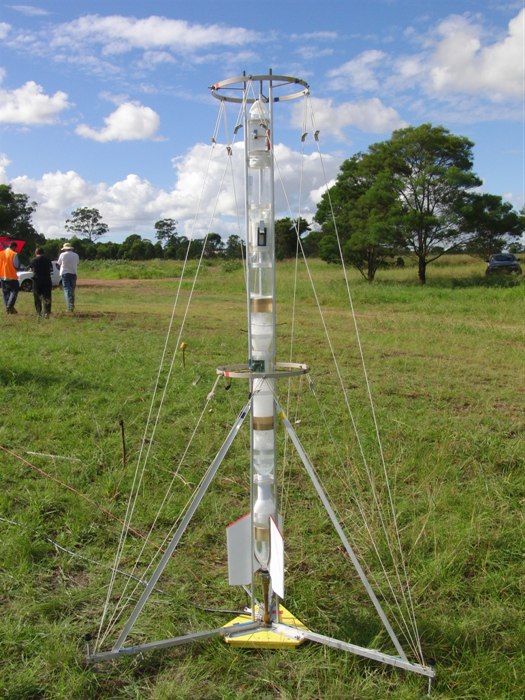
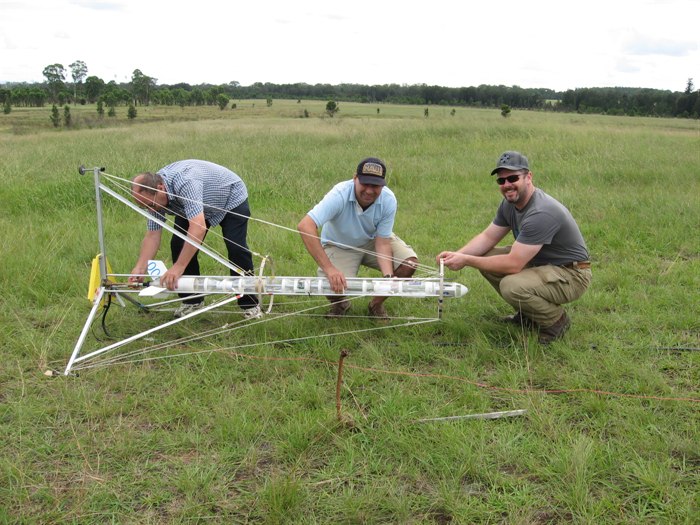
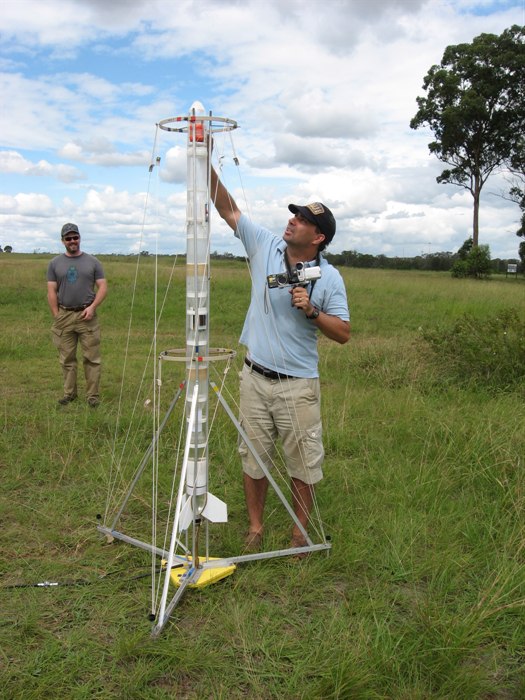
Axion IVb on the pad for test flight
Starting altimeter and camera.
Launched at 120psi with 1.6L of water.
Axion IVb performed well.
Axion IVb's second flight. Rockets are a bit
of an old hat now for the kids. Here more
interested in playing with foam than watching
the rocket.
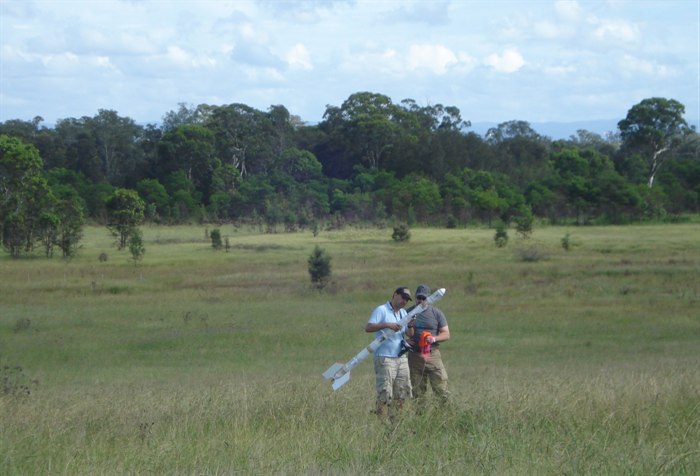
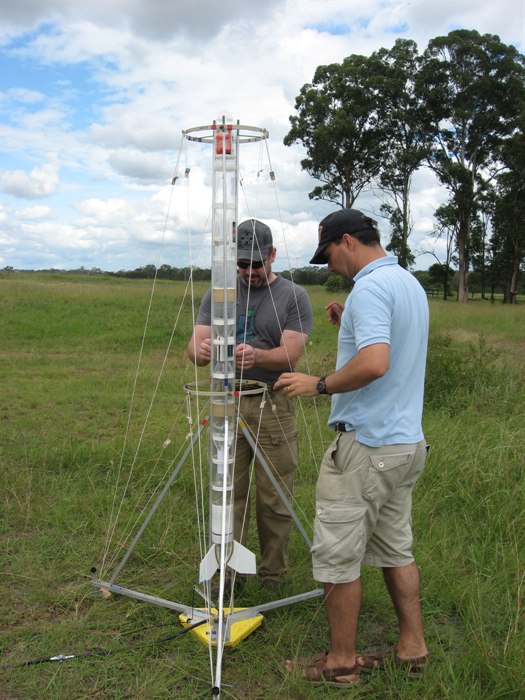
Checking Craig's flight computer.
Switching over to Axion rocket for high
speed launches.
Craig helping us load the rocket into the
launcher. We have to tip it over in order to get
the rocket in without spilling the water.
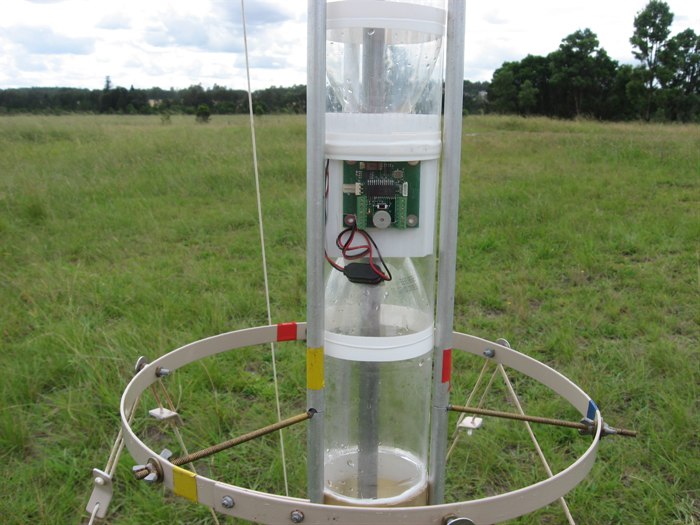
Craig, arming his computer for flight.
Craig's computer has an accelerometer and a
barometric sensor on board.
Arming deployment mechanism before flight.
"Junior" going for a ride instead of the
altimeter.
20G launch with a 15mm nozzle using a launch
tube.
Date:14th
March 2010
Location:Doonside, NSW, Australia
Conditions:Warm 24C, partly cloudy
10+km/h wind.
Team Members at Event:PK,
GK, AK, PaulK,
John K and Jordan K.
We had a fun weekend at Doonside this
week launching a couple of different rockets
and testing a few things. The first one was
flight qualifying the sustainer for the
Acceleron V booster and taking Craig's
flight computer for a ride to gather flight
data.
Axion IVb
The Axion IVb rocket is almost identical
to its previous version with the exception
that the Robinson Coupling in the lowest
bottle is replaced with a tornado coupling
and an insert that allows jet foaming to
happen. This was designed to help prevent
the base of the bottle blowing up at the
coupling like has happened a number of
times. For this we
made a small spliced pair of bottles to
replace the regular 1.25L bottle at the
bottom.
This is because the normal spliced
pair has a capacity of around 2.1L and we
are going to be putting only 1.3 or 1.4L
into the sustainer. This would have resulted
in pretty much all the water settling in the
lowest bottle preventing jet foaming from
working properly. The small capacity bottle
pair makes sure some water remains in the
upper bottes. The good side-effect of using
the tornado couplings is that you get much
better alignment of the bottles than you do
with Robinson couplings. With Robinson
couplings the alignment is dependent on the
geometry of the base of the bottle and how
well you can drill the hole in the center.
We would often get instances where the
coupling would be very slightly angled to
one side when tightened.
We also wanted to test the new 2L bottle
splicing technique on the 1.25L bottles. We
did not have any re-enforcing on these
bottles, as they can handle the 120-130psi
pressures without problems.
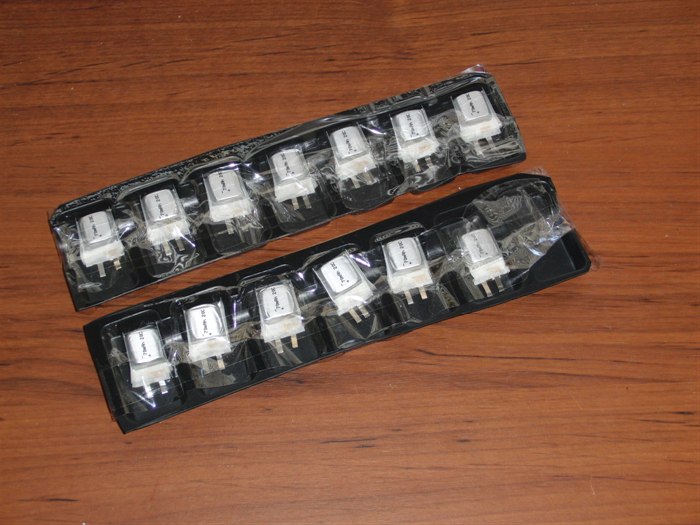
LiPo Batteries
We have mostly been using 9V batteries
for our flight computers because they are
easy to get and are cheap. They have a
couple of disadvantages though. They are
relatively heavy (~45grams) and are not
rechargeable so need to be replaced, which
precludes them being mounted more
permanently. There are re-chargeable 9V
batteries, but they cannot deliver the
necessary current.
So a couple of weeks ago I ordered a
whole bunch of
70mAh LiPo batteries with a
20C discharge rate. This should deliver
plenty of power for a whole day worth of
flights. Since servos ideally need at least
4.8V we will need to use two of them 3.7V x
2 = 7.4V. They each weigh around 2g! Since
we'll be converting this to 5V we can't use
a regular 7805 voltage regulator because it
can't maintain line regulation below about
7.5V input. So I've ordered a number of LDO
regulators (L4940V5) and I'll use those
instead. All up the replacement battery
should weigh only 5-6grams. It will be nice
and compact and will be re-chargeable. A 40
gram saving on a smaller rocket can have a
measurable effect on altitude.
I've also been investigating the best way
to charge them and what chargers to use, but
more on that next time.
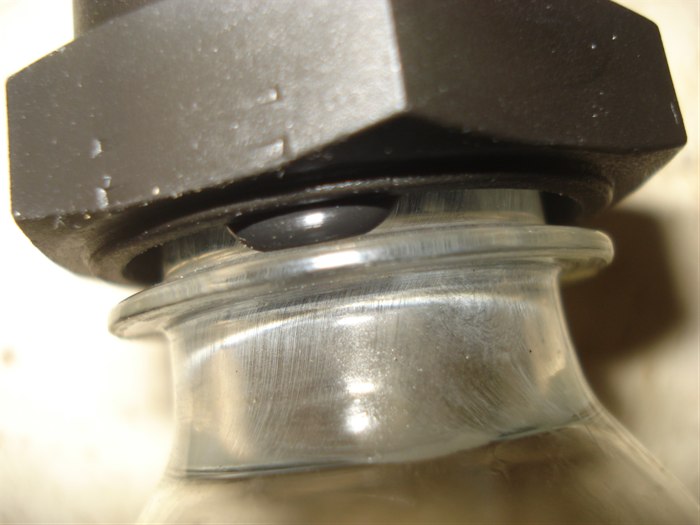
Hard o-rings
During pressure testing of the Acceleron
V booster we had a leak at one of the
tornado couplings. It turned out that one of
the o-rings was pushed out from the gap
between the bottle and coupling. What was
worrying is that it happened at around
30psi. We had seen this at least once before
when launching the flour rocket recently. We
put that down to the fact that the bottle
neck may have shrunk in the sun due to the
black coupling. This would have created a
bigger gap for the o-ring to pop out. This
was a different case though as everything
was new and no heating was involved. It may
be that that particular bottle or coupling
had slightly different dimensions allowing
it to happen. We swapped out the tornado
coupling and turned one of the bottles
around and the problem went away when we
tested it to around 50psi.
During the week dad chased down and
ordered a harder version of the same BS-119
o-rings which should help prevent this from
happening in the future. We used the harder
o-rings on the sustainer test flights
this weekend without issues. We will not be replacing the
o-rings in the assembled booster, but if we
find any more Tornado coupling leaks during
testing or on flight day, then we would
replace them at that stage.
We arrived about 8am at the launch
site, and set up our new collapsible
gazebo to provide some shade. This goes
up a lot faster than the poles and tarp
we used to use.
The first flight off the pad was
Paul's two stage pyro rocket since we
still had a couple of motors left over
from last time. We wanted to make sure
that the last 2-stage flight wasn't just
a fluke. The rocket went up well and the
second stage lit when it was supposed
to, so all in all it was a successful
second 2-stage flight. I believe this
our longest duration rocket flight to
date (water or pyro) at 1:05 min.
The next flight was the first flight
of the new Axion IVb sustainer. It used
the tornado coupling insert to generate
foam. We launched it at 120psi as that
is going to be the initial launch
pressure for Acceleron V. We decided to
drop the launch pressure to 120psi from
130psi for the first flight to give us a
greater safety margin. The rocket took
off slowly and the jet foaming appeared
to work well on the flight.
We flew the rocket with our
altimeter and the original MD80 camera.
On review of the altimeter data it
showed a single 30 foot spike and the
rest of the plot was level. We are not
sure why this was the case, but may had
been a corrupted calibration value? The
two subsequent flights also showed a
similar problem. The next day I hooked
up the altimeter to the computer and did
a proper reset and it appears it has
come to life again. I hope this does not
happen on the actual flight. *fingers
crossed*
The next flight was identical, but
this time we mounted Craig's flight
computer to the mid section of the
rocket. In case the parachute failed I
wanted to have at least a couple of
bottles worth of crumple zone between
the ground and computer. The rocket had
a similar flight, but unfortunately his
computer did not detect launch and did
not record anything. With foam and lower
pressure, the acceleration is very low
so I am not surprised it did not detect
it.
For the next two flights we swapped
to the Axion rocket and used a 15mm
nozzle and fitted
the launch tube to the launcher. We also
removed the jet foaming insert in order
to get the launch tube to go in. We did
not use any foam since we wanted to get
a high-G take off to hopefully trigger
the flight computer.
On both
flights the flight computer detected launch
and recorded good data. These flights peaked
at roughly 20G. In the onboard video you
could hear Craig's computer beep after
the rocket reached apogee, which is what was
expected. This was triggered by the onboard
timer.
We also benefited from these test flights
since this was the first time we got some
real accelerometer data. (See below)
The last flight also had a little
character mounted in its payload bay.
Unrelated to rocketry this little
character "Junior" has been travelling
around Australia for about a year,
visiting all sorts of people and they
always take photos of him in different
locations. It was Juniors turn to fly in
a rocket this time.
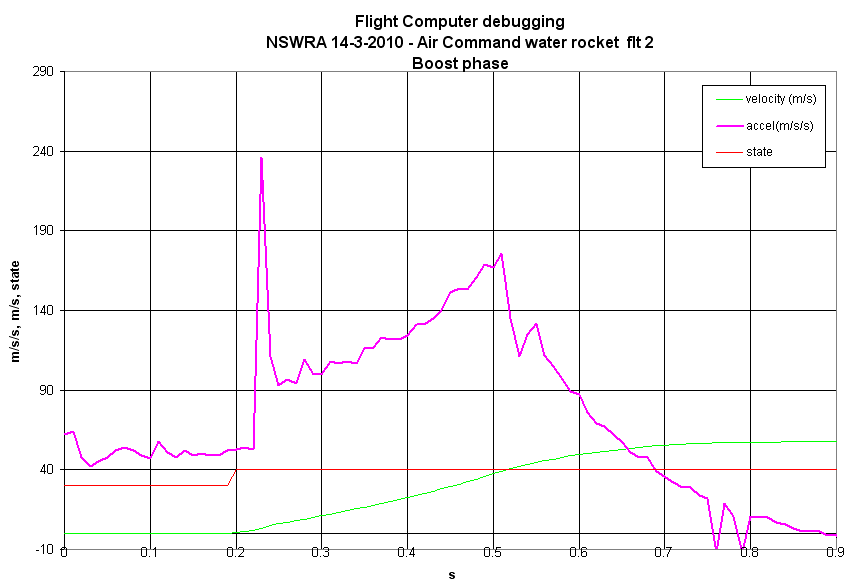
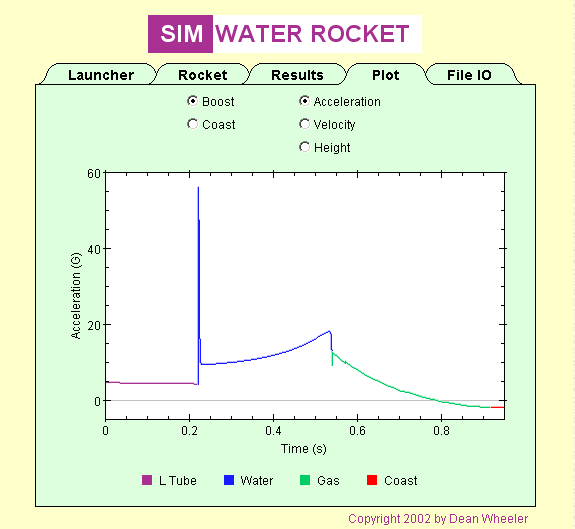
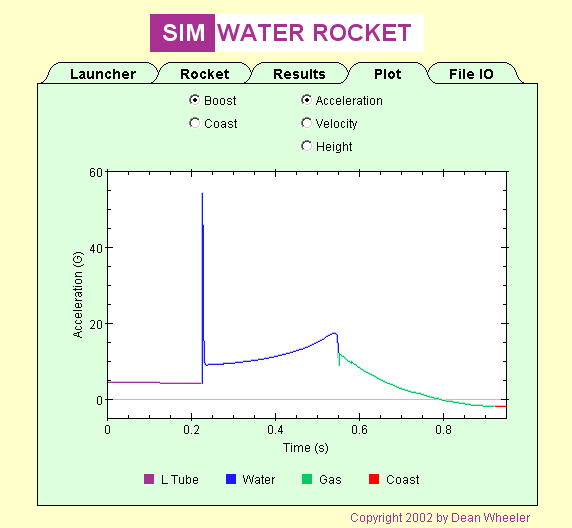
Flight Data
Following is the captured accelerometer
data from both flights. We noticed a large
spike in the acceleration just after the
launch tube phase. At the time I put this
down to an error in the data.
Actual captured data from the two
flights from Craig's flight computer
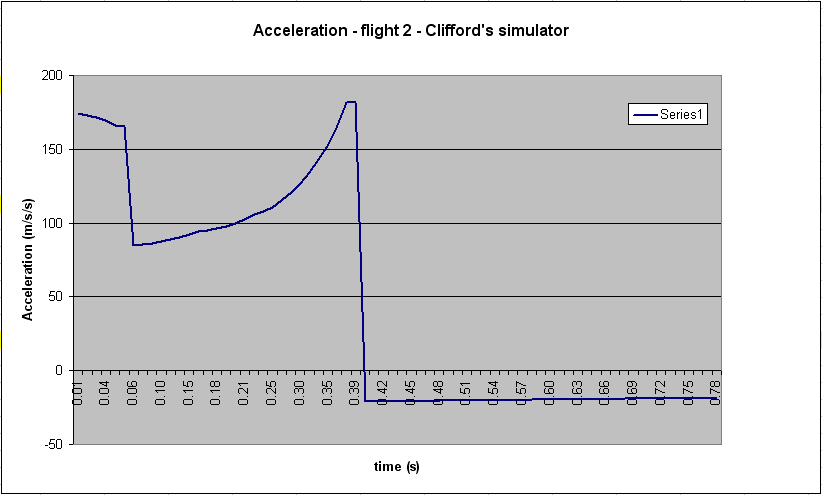
When we got home we ran simulations with
Clifford's simulator to see if we could
compare the results to what we saw. There
was a problem though because the launch tube
phase looked quite different. Clifford's
simulator showed a large acceleration during
the launch tube phase, higher than the start
of the water phase averaging around
170m/s/s. The accelerometer data showed
closer to 50m/s/s. The timing also did not
look quite correct with the air pulse
starting around 0.39s.
Clifford's simulator
results
So I decided to run
Paul Grosses' simulator to see if there
was any difference. Paul's simulator showed
the launch tube phase much closer to the
accelerometer data. It showed the launch
tube acceleration phase at 45m/s/s, however,
it showed a large spike at the start of the
air phase. I know both of the simulators use
an instantaneous impulse function developed
by Bruce Berggren to model the air-pulse
phase and so the observed decaying air-phase
is not shown. The timing though on Paul's
sim looked correct and much closer to what
was captured in real life.
Paul Grosse's simulator
results
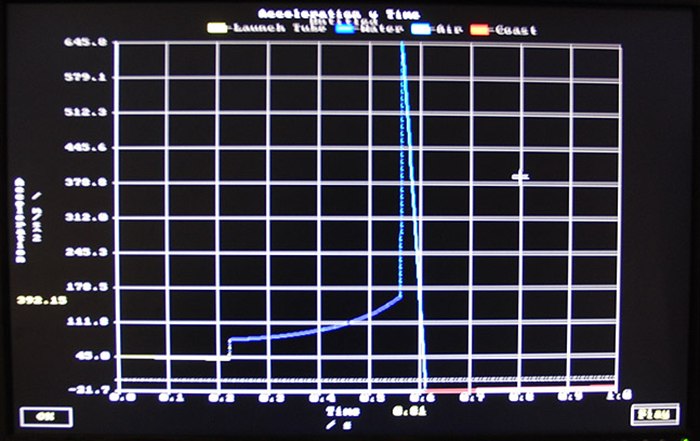
So it was onto
Dean Wheeler's simulation to compare all
three. Dean's simulator seemed to be the
most accurate in modelling the observed
data. What was a big surprise was that the
sim even showed the big spike at the end of
the launch tube phase. His simulator also
showed the correct timing and the decaying
air pulse.
Flight 2
Flight 3
Dean Wheeler's simulation results
It appears there may be
a problem with Clifford's simulator when
a launch tube is used. I compared the
results for altitude prediction without
the launch tube and the results were
very close in the different simulators,
however, when a launch tube was used
Clifford's simulator appeared to give
more optimistic results for altitude.
We'll do more experiments next time and
compare the real data to the three
simulators again, taking altimeter data
into account.
Flight Details
Launch
Details
1
Rocket
Pod 2 (Paul's Praetor)
Motor
C6-0, first stage C6-5
second stage
Altitude / Time
? / 1:05 min
Notes
Good burn on both
stages. Rocket went mostly
vertically. Parachute deployed near
apogee.
Good vertical
flight. Jet foaming insert worked
well to make foam. Altimeter failed
to record data. Video recorded well.
Good parachute deployment and good
landing.