|
Date: 15th
April 2010
Location:
Workshop
Conditions:
Warm 24C.
Team Members at Event:
PK and
GK
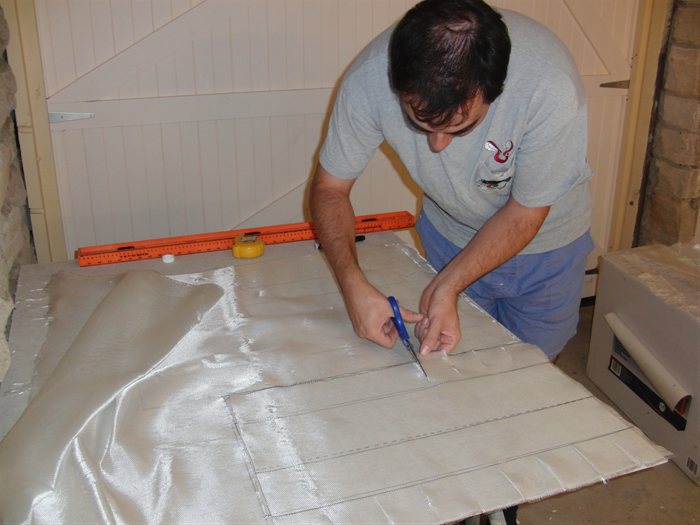
Fiberglassing
Two weeks ago we took our first plunge
into fiberglassing pressure vessels for our
rockets. We know that eventually in order to
get peak performance we will need to be
using more expensive composite materials,
but at least this way we can limit the costs
while learning the necessary techniques. We
have previously made some fiberglass
components such as nosecones and fins but
have not tried reinforcing bottles.
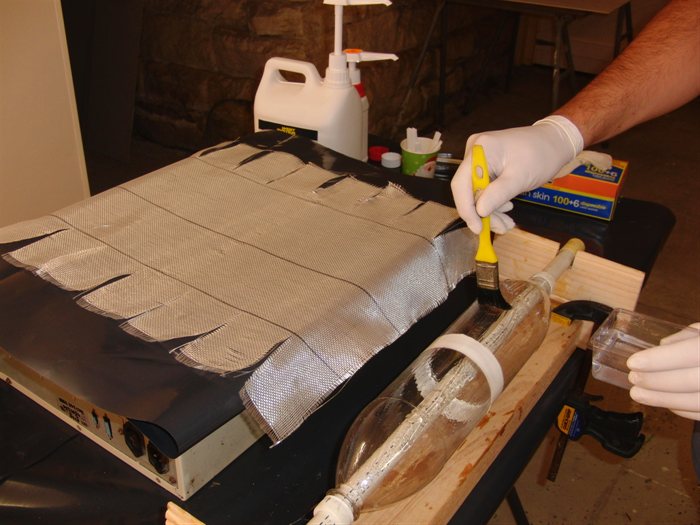
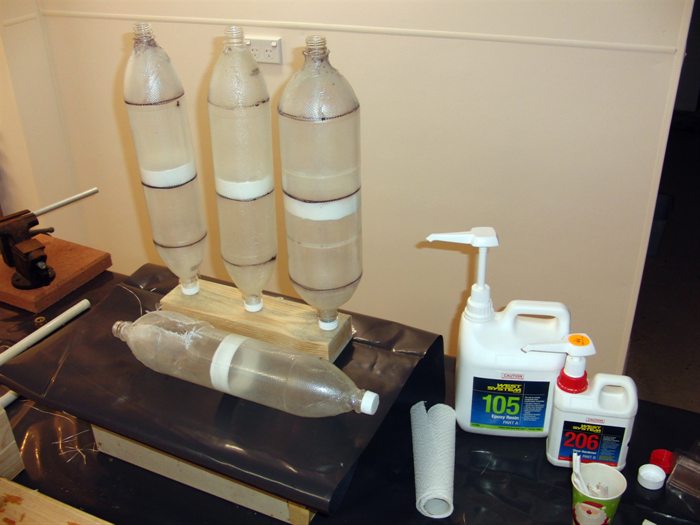
We are using
West
Systems 105 Epoxy and 206 hardener as
the resin. For the first tests we used
200gsm E-glass wrapped on a spliced-pairs of
bottles. The spliced-pair acts as the
internal air bladder. We only spliced these
with the Sikaflex 11FC to give an air tight
seal, but we are relying on the fiberglass
to prevent the two ends from flying apart.
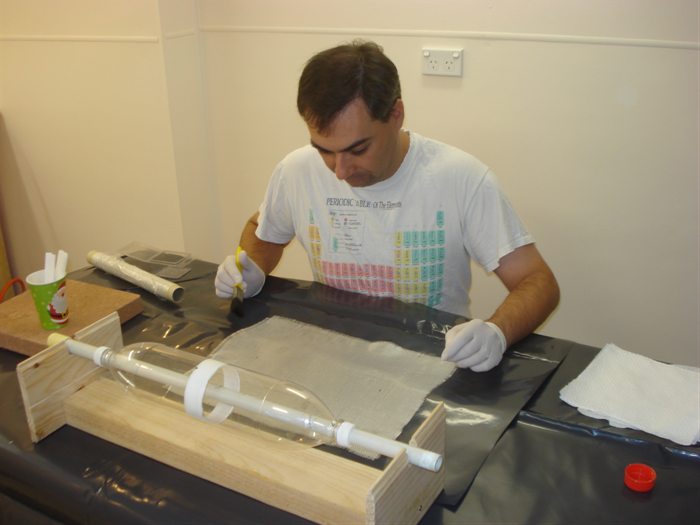
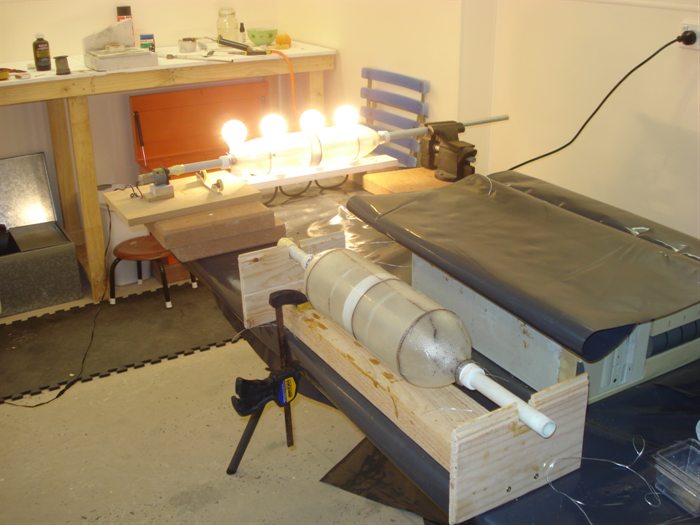
After wrapping the bottles we set them up
on an improvised rotisserie and placed them
next to a series of light bulbs to cure the
epoxy faster. We measured the temperature
carefully so that it was around 30 C at the
surface of the bottles to prevent the
bottles from shrinking.
We did not try any peel ply, or heat
shrink tape on the outside for these tests.
We will most likely try that in the future
to remove the excess epoxy and give a
smoother finish. Vacuum bagging is also
something we may consider though that may be
a little tricky.
Tests
WARNING: If you are going to
attempt to reproduce any of these results,
PLEASE pay attention to safety due to the
higher pressures involved. Always conduct
these tests behind a safety barrier and use
eye and ear protection. Make sure your test
equipment is rated for the pressures used.
We tested 4 spliced-pairs of bottles. One
pair used a single wrap of glass on a 90mm
body (there was about 1 inch of overlap),
two used a double wrap on a 90mm body, and
the last used a double wrap on a 110mm body.
The 90mm spliced-pairs hold 2L each and the
110mm spliced-pair holds 3.15L.
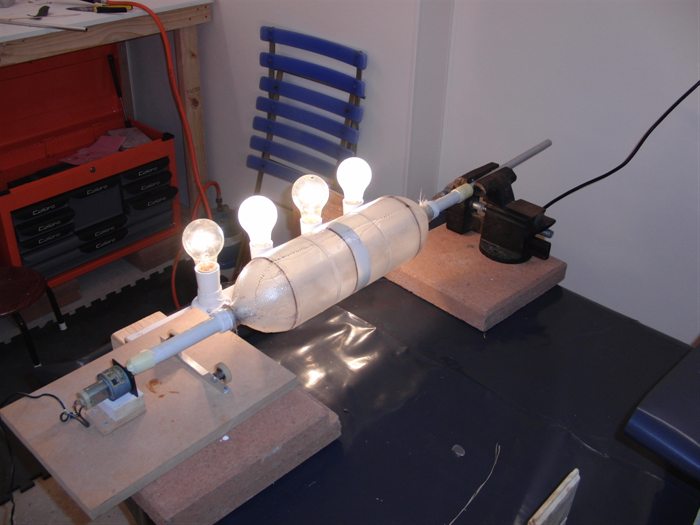
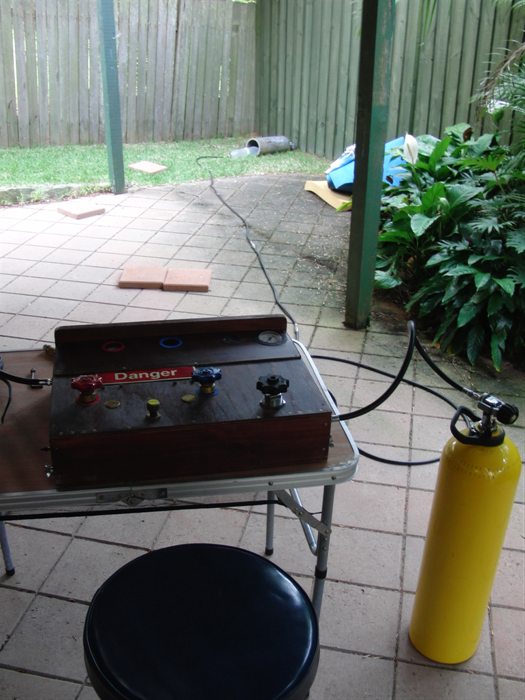
We hydrostatically tested these inside an
old scuba tank with the bottom cut off to
contain the noise. We used our high pressure
panel for the tests.
The results:
These results are preliminary and will
need to be repeated a number of times to
confirm their accuracy.
90mm
Spliced Pair
(2L capacity)
|
Splice
Weight (grams) |
Burst
Pressure
(psi / bar) |
Notes |
|
Sikaflex 11FC only |
60 |
~110 / 7.5 |
Failure occurs in the splice as
the glue fails |
Sikaflex 11FC with PL premium
attached sleeve
|
83 |
~180 / 12 |
Here the splice is stronger than
the bottle and the bottle fails. |
|
Sikaflex 11FC with single 200gsm
glass wrap |
135 |
220 / 15 |
Normal bottle failure with glass
torn though |
|
Sikaflex 11FC with double 200gsm
glass wrap |
157 |
300+ / 21+ |
Limit of test equipment reached
without spliced-pair failure.
Two spliced-pairs were tested at
this pressure. |
110mm
Spliced Pair
(3.15L capacity)
|
Splice
Weight (grams) |
Burst
Pressure
(psi / bar) |
Notes |
|
Sikaflex 11FC only |
75 |
~100 / 7 |
Failure occurs in the splice as
the glue fails |
|
Sikaflex 11FC with PL premium
attached sleeve and reinforced
ends using bottle ends held down
with glass strapping tape. |
143
|
~190 / 13 |
Here the splice is stronger than
the bottle and the bottle fails. |
|
Sikaflex 11FC with double 200gsm
glass wrap |
214 |
300+ / 21+ |
Limit of test equipment reached
without spliced-pair failure. |
Conclusions / Observations
- The single glass wrap on a 90mm
spliced-pair was a little disappointing
at 220psi because it means the actual
launch pressure would be closer to
170-180psi.
- The 300psi+ pressure for the double
wrapped bottles was a very good result.
We don't know how much more it can hold,
but the launch pressure would be at
least 250psi. Our high pressure panel
only goes to 300psi so we could not test
to higher pressures. The bottles did not
show any sign of stress when inspected
after the test.
- The 300psi test told us that the
regular bottle caps we use can also hold
at least that much pressure.
- The Sikaflex 11FC alone was able to
provide an air tight seal without
needing the PL premium sleeve to help
hold the splice together.
- Each double wrapped bottle costs
about $4 in glass and glue materials,
which is quite reasonable.
- From the 4.8L of epoxy and hardener
we can make about 100 spliced-pairs of
1.25L bottles, and about 65 of the 2L
bottles.
- The double wrapped 110mm
spliced pair had a 300+ psi burst
pressure. This was a better result than
we had expected.
Simulating performance
Because the reinforced spliced-pairs are
heavier we ran a number of simulations to
see at what point the glass reinforcing is
going to give us better performance over the
lighter but weaker spliced bottles.
We weighed all of the non-pressure vessel
related components from one of our typical
rockets (Axion) which are flown regardless
of the material the pressure vessels are
made of. The total weight of these
components was 380 grams and included,
parachute deployment mechanism, nosecone,
parachute, camera, tornado tubes, nozzle,
fairings and fins.
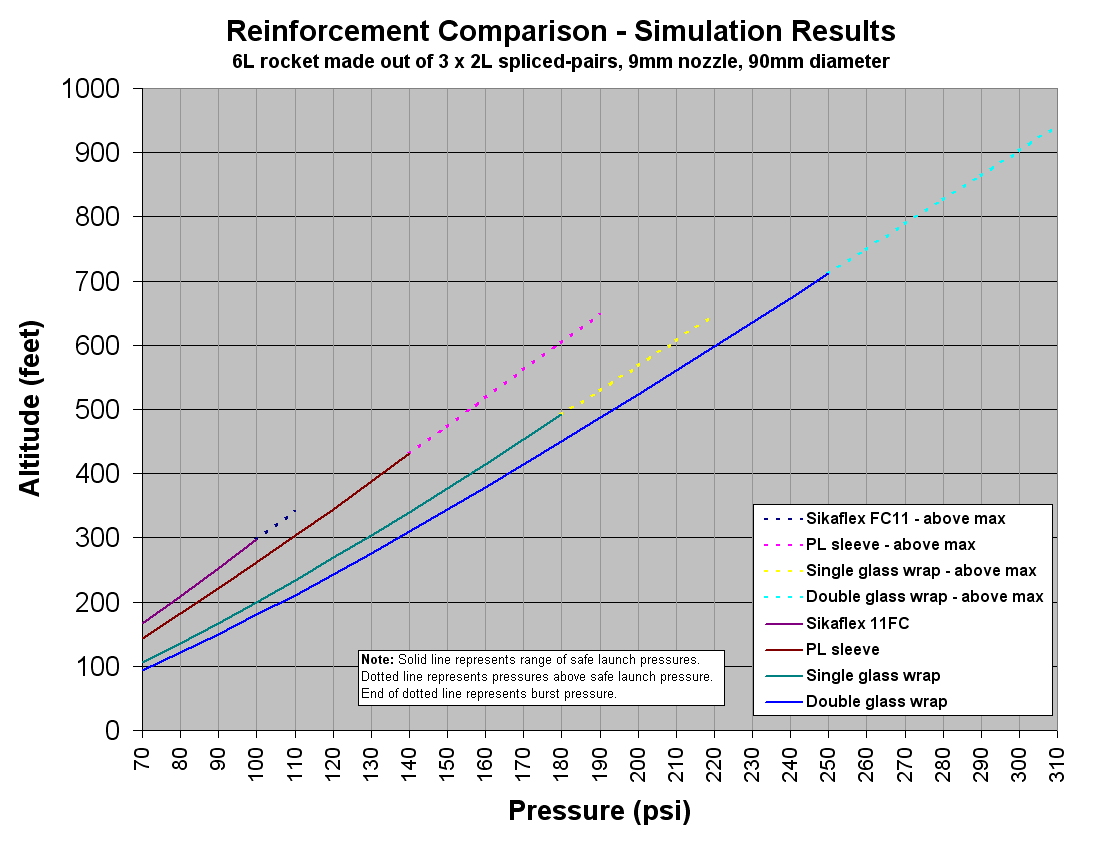
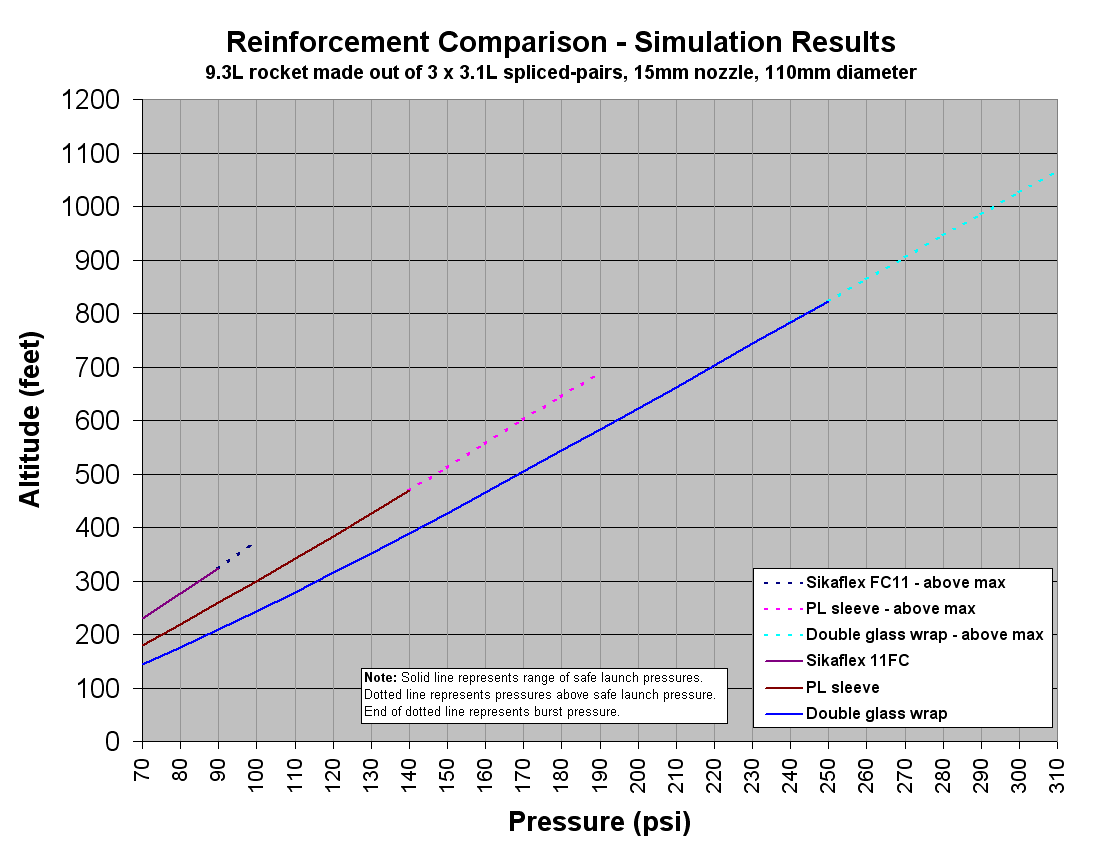
We ran two sets of sims on two different
rockets. One rocket was made of 3 x 90mm
spliced pairs giving a total capacity of 6L
with a 9mm nozzle. The other rocket was
constructed from 3 x 110mm spliced-pairs
giving a total capacity of 9.3L with a 15mm
nozzle. We did not use a launch tube for
either simulation.
We used Clifford's simulator to calculate
the expected altitude in 10psi increments.
In all cases the coefficient of drag was the
same, and we always let the simulator pick
the optimal amount of water for each
pressure. In the graphs below we compare the
4 different 90mm spliced-pairs and their
expected behaviour. The second graph
represents the rockets made out of the
different 110mm spliced-pairs. The solid
lines represent the range of safe launch
pressures, and the dotted line represents
pressures up to the burst pressure. The end
of the dotted line represents the burst
pressure.
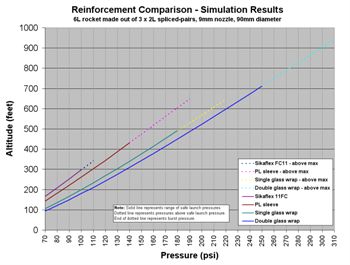
Graph 1 - 90mm rocket
performance comparison using different
reinforcement techniques.
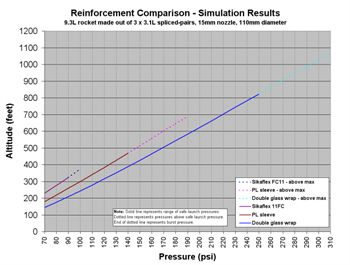
Graph 2 - 110mm rocket
performance comparison using different
reinforcement techniques.
Conclusions
In Graph 1 the PL sleeve line represents
the splicing technique we have been using
for most of our rockets. From the graph you
can see that the single glass wrap only
gives modest altitude gains and requires
about 20psi more to break even. However, the
double glass wrap gives significantly higher
altitudes and takes an extra 30psi over the
PL sleeve to break even.
The actual altitudes are only
theoretical, so real world results will
differ.
Similar results were obtained for the
110mm spliced-pairs. I look forward to
launching a 4 x spliced-pair with a long
launch tube. :)
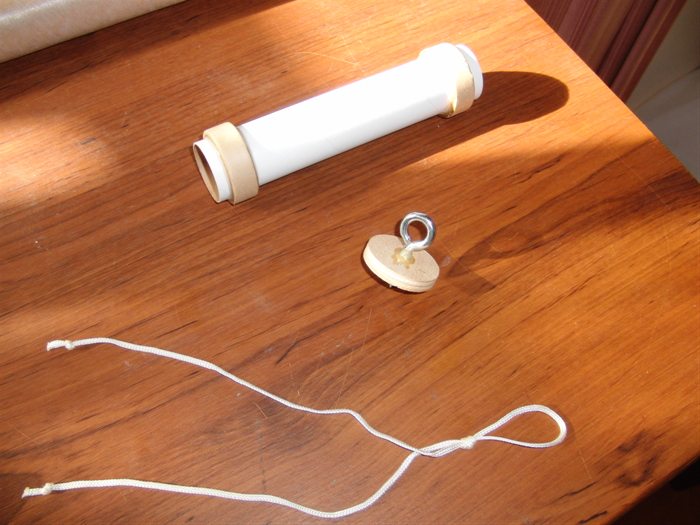
Tornado Tubes
We hydrostatically pressure
tested the tornado tubes to 170psi (before
an non-reinforced bottle connected to it
failed). We'll have a go at building a
rocket using these in upcoming test flights.
We think that they should be able to hold
higher pressures than the 170psi. We'll put
these on the high pressure test panel to see
if they can hold up to the 300psi mark.
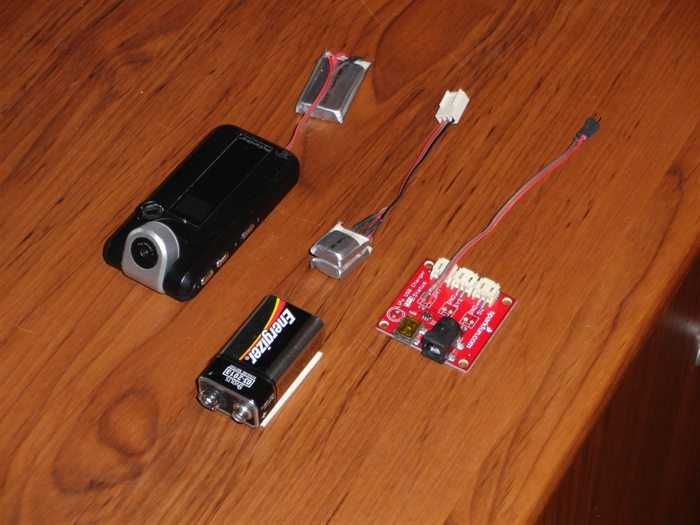
More on LiPo batteries
In the last week we have tested the small
70mA LiPo batteries and voltage regulators
with our current flight computers. They seem
to be working well and are nice and compact.
We will test fly these on upcoming flights
to see how well they perform during the
whole launch day.
We also received the 350mAh LiPo
batteries this week and so set about
replacing the batteries inside the FCO's
cameras. The power issues have been a major
reason why we have stopped using them
recently. These batteries are higher
capacity and bigger than the original
batteries and so need to be housed
externally. Due to their higher capacity
they take about 3-4 hours to fully charge
from the USB port. Having waited a full 24
hours after the charge, I did some recording
tests today. This was a test to allow me to
charge the cameras the day before a launch.
I recorded a couple of long movies until
the card was full. After 43 minutes (when I
actually checked) the camera was still on
and was showing that the card was full. It
looks like the new batteries are working
well.
One of these will be placed back in the
Acceleron V booster. With the new battery
the camera now weighs 44 grams compared to
the 39 grams previously.
For charging the little 70mA batteries I
bought a couple of the SparkFun LiPo
chargers. The charger can only charge a
single cell at a time, but having two means
we can be charging two batteries
simultaneously. This is useful when we need
to recharge several battery packs the night
before launch.
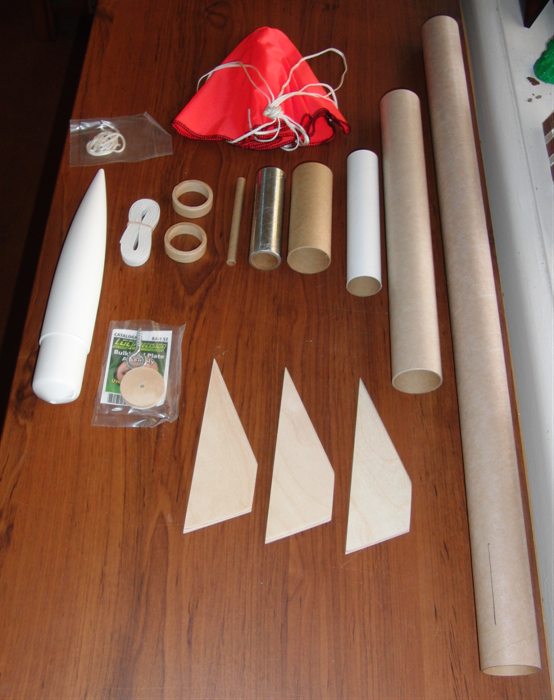
Loc/Precision Weasel
Last month I bought a pyro rocket kit
from
Suburban Rocketry that can handle bigger
motors than the ones we have used until now
in Paul's rockets (up to C impulse motors).
This new rocket can take 29mm motors up to G
impulse. Being a kit, construction was quite
simple, although very different to water
rockets of course. I've posted some build
photos on the left. We will most likely fly
it on a E15 first with a 24mm adapter to see
how it flies and then go up from there. It
has a separate payload bay big enough to
carry altimeters or cameras or both, so I'll
look into making use of it in the future. So
far I've painted it white, but still need to
decide if I am going to put any design on it
... and probably should give it a name.
And no, we are not migrating to pyro
rockets, just expanding our knowledge of the
rocketry hobby. :) |